Layered navigation is a significant point in building a website. In particular, when you suggest visitors extensive product catalogs. With a lot of attributes. Thus you have to help customers avoid boring searching. Let's help them find the desired product faster. Otherwise, a long search could cause giving up the page. You lose customers, you lose a sale. After all, you don’t want this, right?
In previous post we have promised we’d discuss Magento layered navigation in your store.
Continue reading to know how to enable filter products on the category page. Let's get customers engaged in a more convenient buying process.
Month after month we discuss important website issues related to user experience improvements. Well-planned navigation is one of the most essential points to talk about. Thereby today we will talk about:
- What is actually Magento layered navigation is
- How to enable layered navigation on product, category and CMS pages
- How to add color swatches to Magento layered navigation
- Ideas for improving layered navigation in your store
- What are the best layered navigation solutions
We will also show you Magento website samples with built-in layered navigation. You can follow links and try to search for a product in a few clicks.
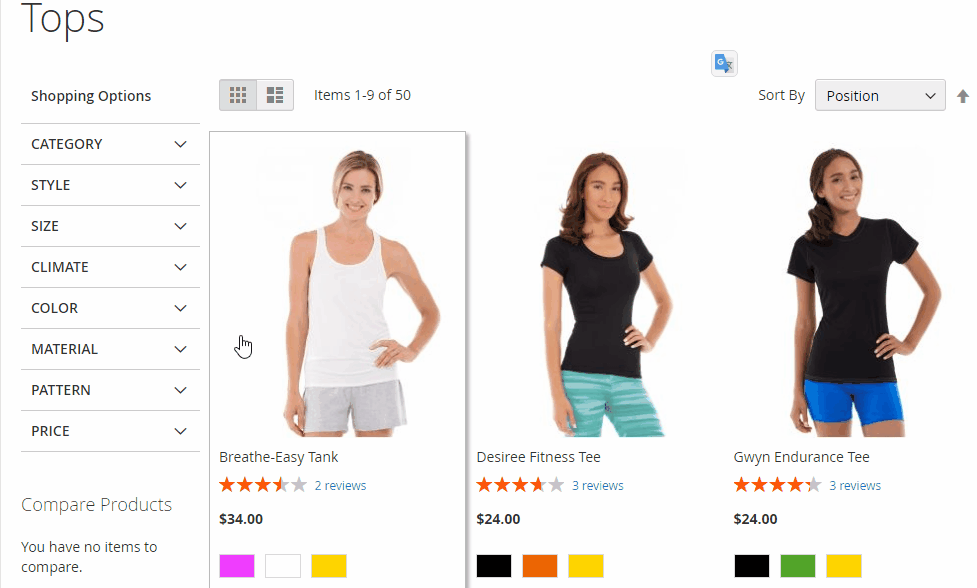
You know that you can display product filters on the anchor category and on search results pages only.
To show layered navigation with filterable attributes on your store pages, you have to go through the steps shown below.
5 steps to follow when you create Magento Layered navigation
- Create Attribute that will be used in layered navigation.
- Assign attribute to relevant attribute set.
- Create a product based on this attribute set.
- Enable layered navigation to category you need.
Now you can see a layered navigation block on the category page. Please remember you should always set a category as Anchor if you want to make a category that has a filter functionality. We’re going to describe attribute creating only. Before we start we’d like you to know some Magento default points about filterable attributes:
- Product filters are dynamic. Each option of the filter is correlated with a product. For instance, if you want to show a color filter in layered navigation block, you should assign a color attribute to the product in the current category.
- There are 3 attribute types that can be used in Magento layered navigation: dropdown, multiple select and price types.
- You can’t change the attribute set for the products after creating that.
What’s next?
Let’s create an attribute and assign it to the products. Of course, you did it a hundred times, so we just remind you. Follow this step-by-step guide:
- Go to Admin -> Catalog -> Attributes -> Manage Attributes. Click Add new attribute.
- Fill out all fields in the Properties fieldset. Save.
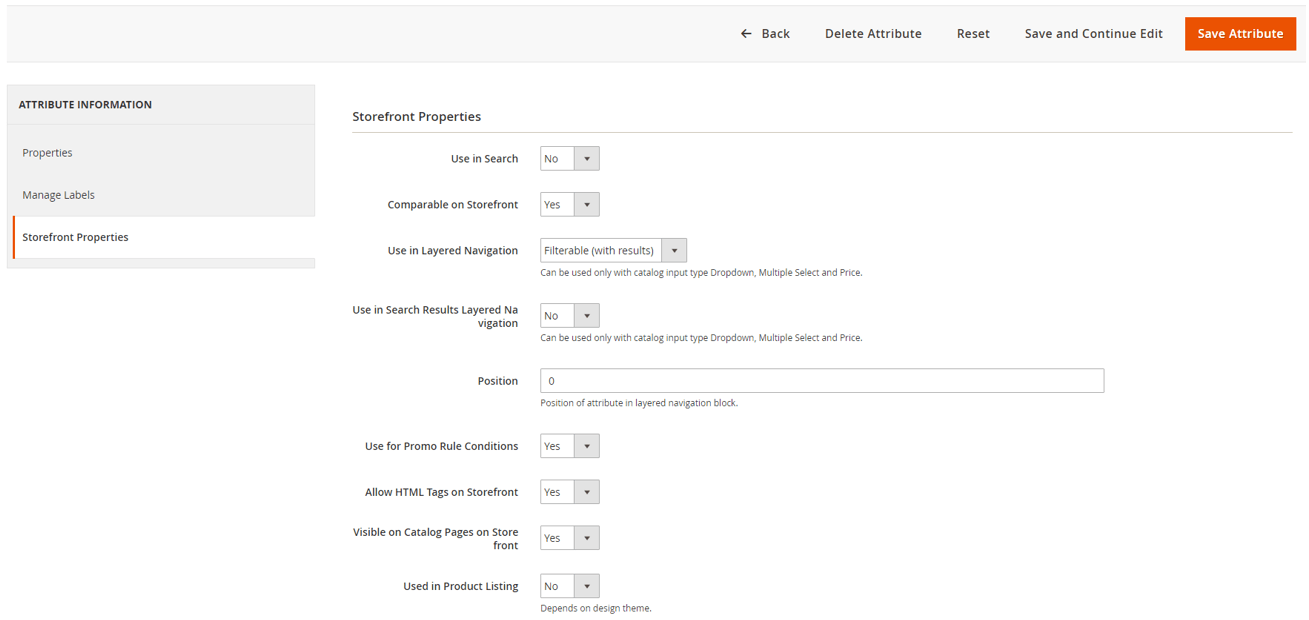
- Set the attribute to be used in Layered navigation. You can choose between Filterable (with results) and Filterable (no results) values.
- Define a type for attribute. You can choose from Dropdown Menu, Price Type and Multiple Select. Set the type in Catalog Input Type for Store Owner field. Please remember that you may not change it later.
- Select Yes in Use In Search Results Layered Navigation field.
- Using Label/ Option tab you can add as many values of the attribute as you need.
- Go to Catalog -> Attributes -> Manage Attributes sets. You will assign an attribute to the attribute set. Click Add new set. Fill the fields and save.
- Now you can see the created attribute set. Move your new attribute from Unassigned attributes to the group you need. Save.
- Please add a product in Catalog -> Manage Products. You can see the attribute set drop down, where you may select the one you’ve created before. Press Continue.
- Go on creating a product based on new product attribute set. Choose attribute value for product. Save.
Now you've got a possibility to filter a product list based on its attributes. This will help you to make navigation on the website more user-friendly. Users will search for products by available product attributes. Such as color, size, style, price, brand, material, category, etc.
That’s the way the layered navigation is.
By default, Magento allows the filtering of the products by the only one option. Yet, you intend to make a user shopping experience much better, do you? If you don’t want to limit your visitors only with searching by category or a price range, keep reading...
Now let's consider the most popular requests related to layered navigation. As usual, we are gonna present the information separately for Magento and Magento 2 versions.
How to show layered navigation in the top block of the main column
Steps for Magento 1
By default the block with product filters is shown in the left column. However, you can show the layered navigation on the top.
Please create app/design/frontend/<package>/<theme>/layout/local.xml with the following content:
<?xml version="1.0"?>
<layout version="0.1.0">
<catalog_category_layered>
<!-- set one-column layout -->
<reference name="root">
<action method="setTemplate">
<template>page/1column.phtml</template>
</action>
</reference>
<!-- remove old leftnav -->
<remove name="catalog.leftnav" />
<!-- add new leftnav to content -->
<reference name="content">
<block type="catalog/layer_view" name="catalog.leftnav1" before="-" template="catalog/layer/view.phtml">
<block type="core/text_list" name="catalog.leftnav1.state.renderers" as="state_renderers" />
</block>
</reference>
</catalog_category_layered>
</layout>
The last step you have to do is to modify the vertical layout to horizontal with CSS.
Steps for Magento 2
Go to Admin - Products - Categories - Select Category - Design Tab - Layout and choose 1 Column. Now you can see the layered navigation placed at the top in content area.
How to move layered navigation to the right sidebar
Steps for Magento 1
Create app/design/frontend/<package>/<theme>/layout/local.xml with the following content:
<?xml version="1.0"?>
<layout version="0.1.0">
Steps for Magento 2
Go to Admin - Products - Categories - Select Category - Design Tab - Layout and choose 2 Column Right. Now you can see the layered navigation placed in the right sidebar.
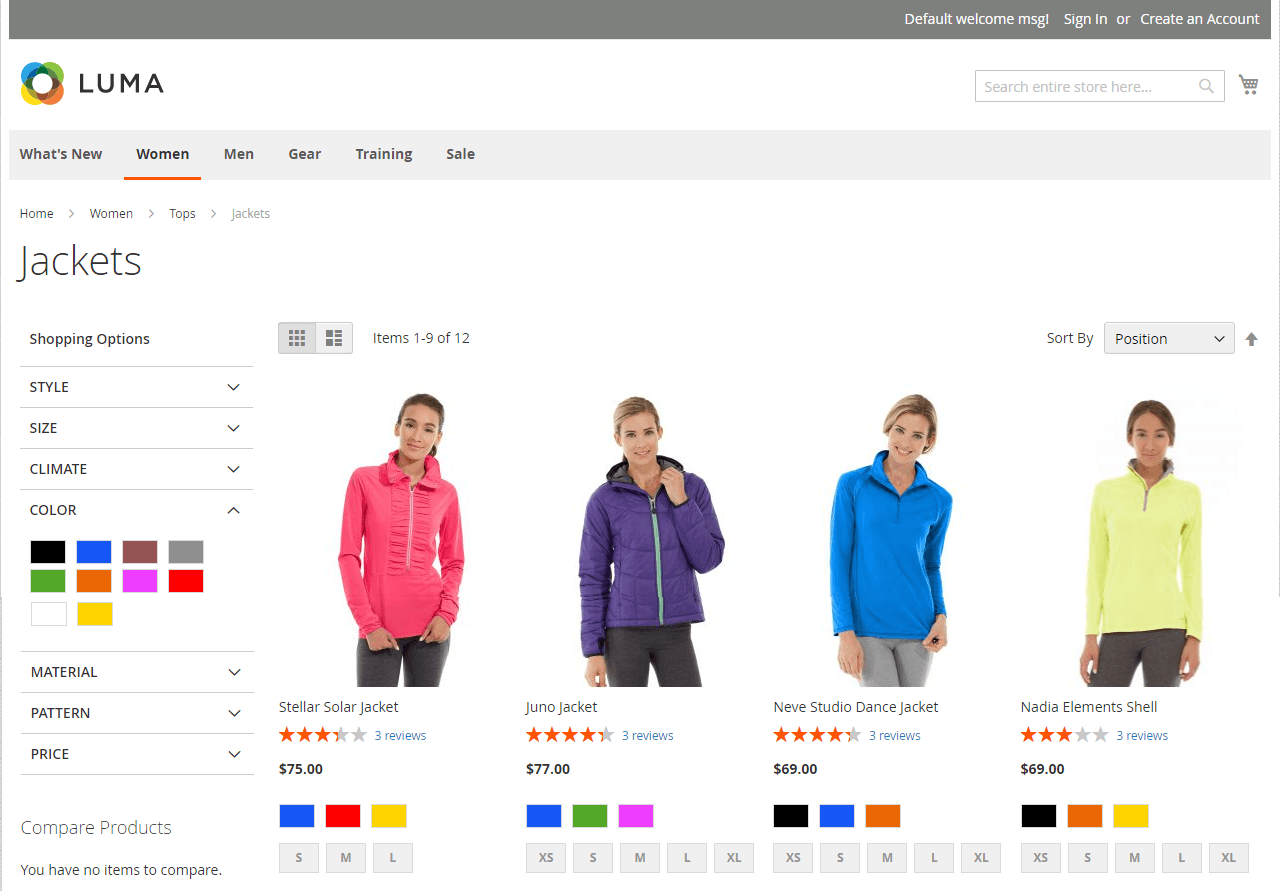
How to use color swatches in layered navigation
Let's help customers to choose the desired product by color. This will speed up the purchase and improve user experience.
Steps for Magento 1
- Go Admin - Catalog - Attribute - Manage Attributes. Add new attribute.
- Select Manage Label / Options tab to add your attribute values.
- Navigating Catalog - Attribute - Manage Attribute Sets you will create a new attribute set. You will see the newly created attribute Color there in the Unassigned Attributes column. You have to drag it to the left column.
- Color swatches are available within the built-in functionality of the latest Magento releases. So, please go System - Configuration - Configurable Swatches and enable the feature. Choose the attributes you want to show as a swatch. You'll also get the predetermined swatch sizes used for the layered navigation.
- In order to show the swatches in layered navigation you have to start with global swatch images (/media/WYSIWYG/swatches) with the same name as the Color attribute label.
- Now you have 2 ways to get an image for the swatch. The first one is to create a PNG image, that will match a label with a file name. Use all lowercase letters with hyphens. You have to copy the image to media/WYSIWYG/swatches. Or you can open CMS – > Pages - Home Page - Content tab - Insert image, and upload your image to the swatches folder.
- After that go Catalog - Manage products and apply the new color attribute to the newly created product or to the existing one.
Steps for Magento 2
- Go Admin - Stores - Attributes - Product. Find a Color attribute and edit it in the Attribute Properties tab. You can add a color swatch or upload a swatch image. In the Manage swatch grid you can click on the swatch icon and choose a color you need. You can also collect a few color swatches for your product. Save the attribute.
- Clear the cache.
- Go to Admin - Products - Inventory - Catalog. Mark the products the swatch should be applied to. Then choose Update attributes in the Actions field. Navigate to Color field and mark the Change checkbox. Choose a color and save. Don’t forget clear a cache.
How to show layered navigation on CMS page, including Homepage
Steps for Magento 1
The CMS page layout should be “2 column with left bar”. In that case, you will see a layered navigation block at the very top of the left column.
Let’s add the following XML in Layout Update XML field:
<reference name="left">
<block type="catalog/layer_view" name="catalog.leftnav" template="catalog/layer/view.phtml" >
<action method="setCategoryId"><category_id>2</category_id></action>
<block type="core/text_list" name="catalog.leftnav.state.renderers" as="state_renderers" />
</block>
</reference>
Please note, the<category_id>2</category_id> is root category id.
Finally you have to set Is Anchor to Yes for root category in Catalog > Manage Categories > Default Category > Display Settings > Is Anchor. Save. That’s it.
Now you can see a layered navigation block in the left column. To apply filters, you have to create any content on a CMS page. Use the next code to show a product listing. In other words, you will create a category page within a CMS page.
<reference name="content">
<block type="catalog/product_list" name="home" template="catalog/product/list.phtml">
<block type="catalog/product_list_toolbar" name="product_list_toolbar" template="catalog/product/list/toolbar.phtml">
<block type="page/html_pager" name="product_list_toolbar_pager"/>
</block>
<action method="setToolbarBlockName"><name>product_list_toolbar</name></action>
</block>
</reference>
Steps for Magento 2
By default the CMS page layout should be “2 column with left bar”. After adding the following codes you will see a layered navigation block at the very top of the left column.
Please follow the same steps as for Magento 1. We start adding layered navigation block:
<referenceContainer name="sidebar.main">
<block class="Magento\LayeredNavigation\Block\Navigation\Category" name="catalog.leftnav" before="-" template="layer/view.phtml">
<block class="Magento\LayeredNavigation\Block\Navigation\State" name="catalog.navigation.state" as="state" />
<block class="Magento\LayeredNavigation\Block\Navigation\FilterRenderer" name="catalog.navigation.renderer" as="renderer" template="layer/filter.phtml"/>
</block>
</referenceContainer>
Adding products listing block:
<referenceContainer name="content">
<block class="Magento\Catalog\Block\Product\ListProduct" name="category.products.list" as="product_list" template="Magento_Catalog::product/list.phtml">
<container name="category.product.list.additional" as="additional" />
<block class="Magento\Framework\View\Element\RendererList" name="category.product.type.details.renderers" as="details.renderers">
<block class="Magento\Framework\View\Element\Template" as="default"/>
</block>
<block class="Magento\Catalog\Block\Product\ProductList\Item\Container" name="category.product.addto" as="addto">
<block class="Magento\Catalog\Block\Product\ProductList\Item\AddTo\Compare"
 name="category.product.addto.compare" as="compare"
 template="Magento_Catalog::product/list/addto/compare.phtml"/>
</block>
<block class="Magento\Catalog\Block\Product\ProductList\Toolbar" name="product_list_toolbar" template="Magento_Catalog::product/list/toolbar.phtml">
<block class="Magento\Theme\Block\Html\Pager" name="product_list_toolbar_pager"/>
</block>
<action method="setToolbarBlockName">
<argument name="name" xsi:type="string">product_list_toolbar</argument>
</action>
</block>
</referenceContainer>
Well, you see that the layered navigation looks great anywhere in a store. You can place layered navigation filters by following all the steps mentioned above. Yet, there are also other approaches to help users find a product much faster.
Read to the end to find out the best ready to use solution…
In fact, you can improve navigation with just a few clicks. Magento layered navigation extensions will be useful.
5 ideas on how to improve layered navigation with great examples of Magento layered navigation
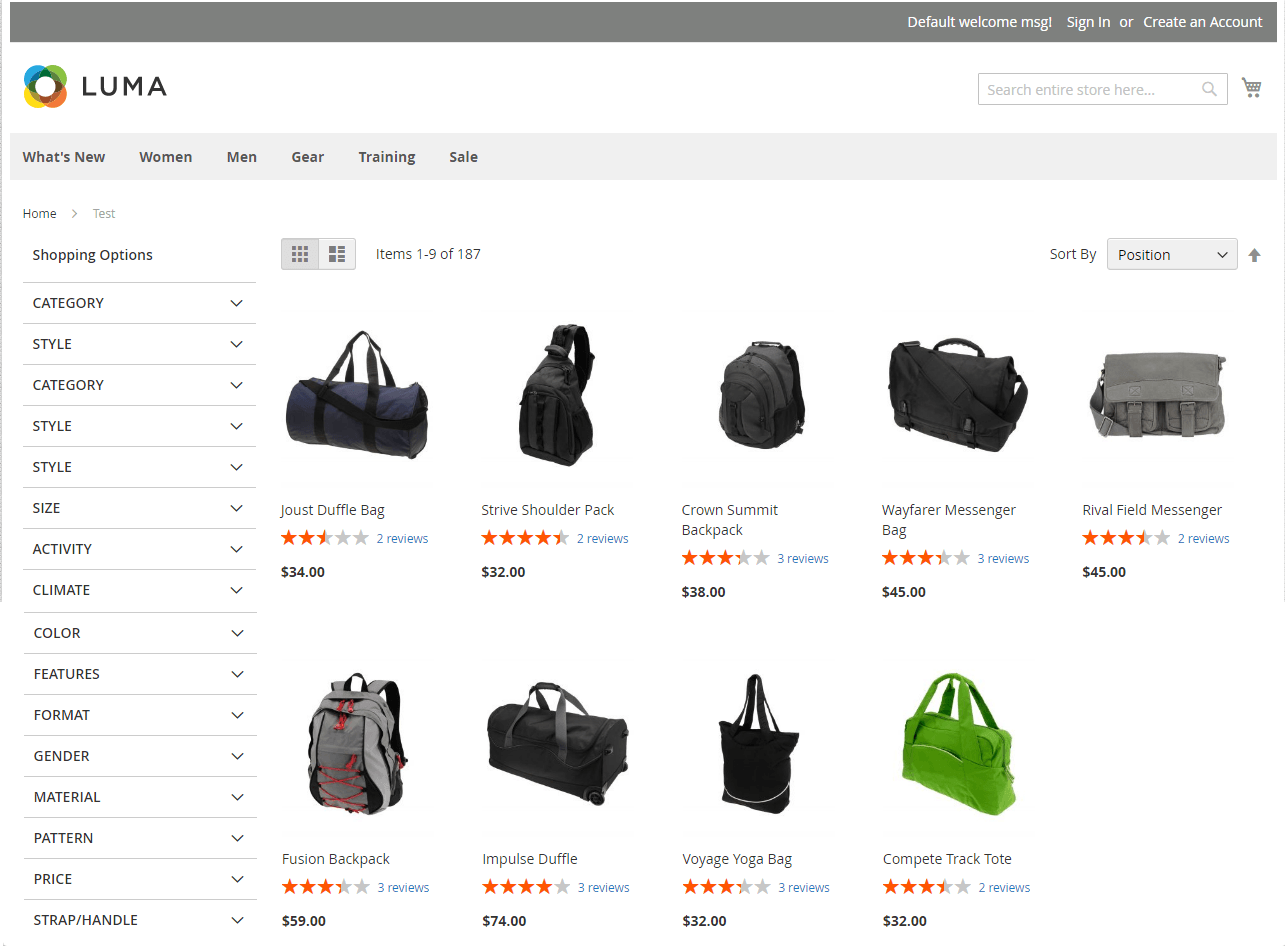
We're going to consider 5 famous online stores built with Magento. They use layered navigation in different ways. You can follow site samples to choose the most friendly navigation approach for you.
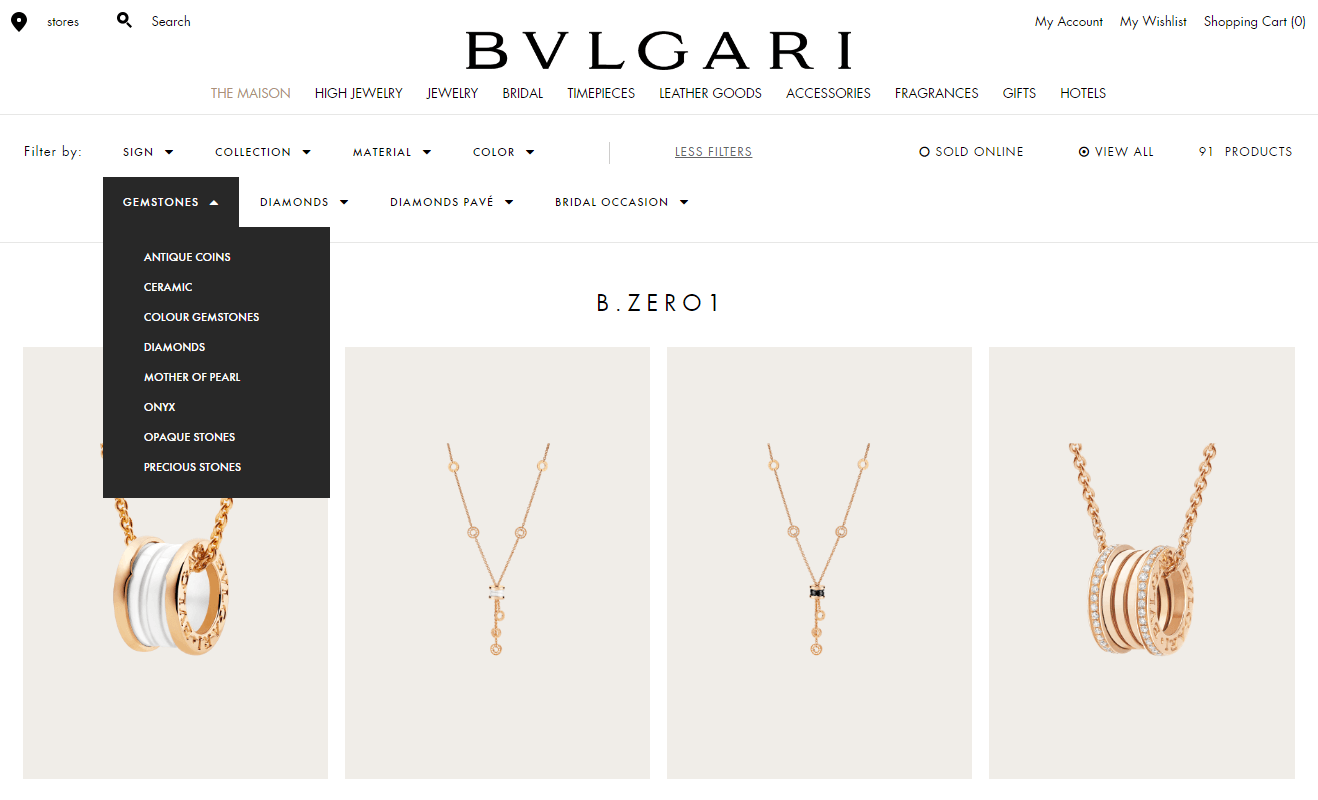
Bulgari was founded as a jewelry shop in 1884. This is an Italian company that is part of the French luxury group LVMH since 2011. The company keeps designing glamorous gemstone jewelry, luxury watches, perfumes, and leather staff. While selling goods online Bulgari prefers to use top layered navigation. They suppose that the top navigation items are more visible and easier to find. There’s an implicit rule that the navigation shown at the top is accompanied by the header and logo - the most catchy elements on a web page.
So, the Bulgari idea is to show layered navigation on the top.
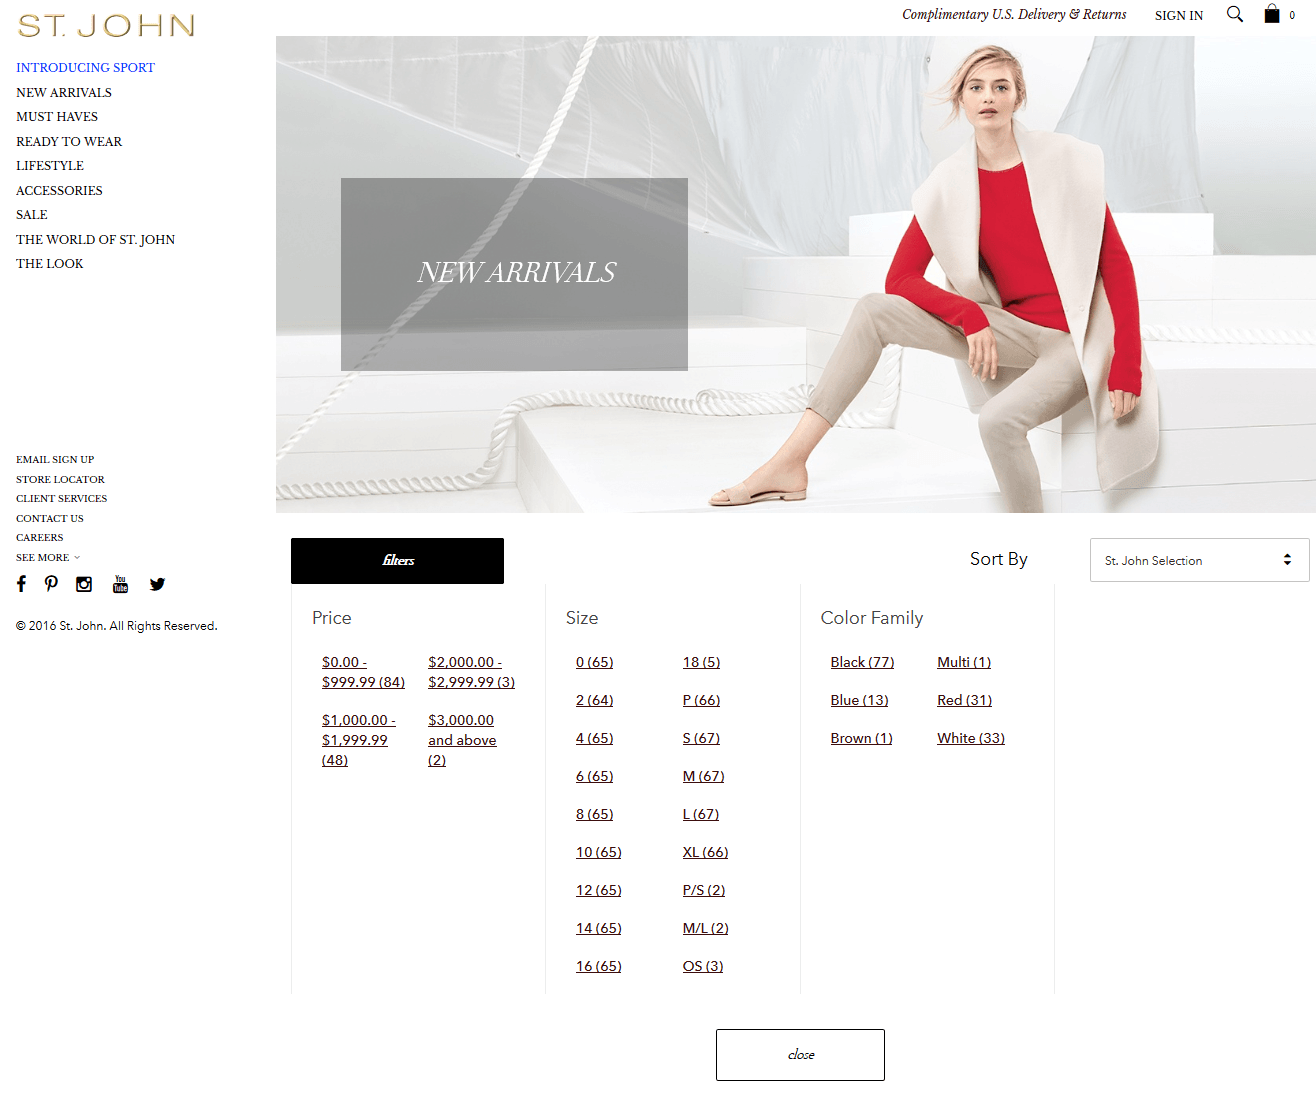
The St. John company provides its customers with nice clothing created for every occasion. Over 53-years the clients worldwide buy the apparel and accessories not only in the market but online, too. We mention St.John site because of great usability at all. And the layered navigation is one such example.
The St.John idea is to show the availability of the product in numbers per each attribute.
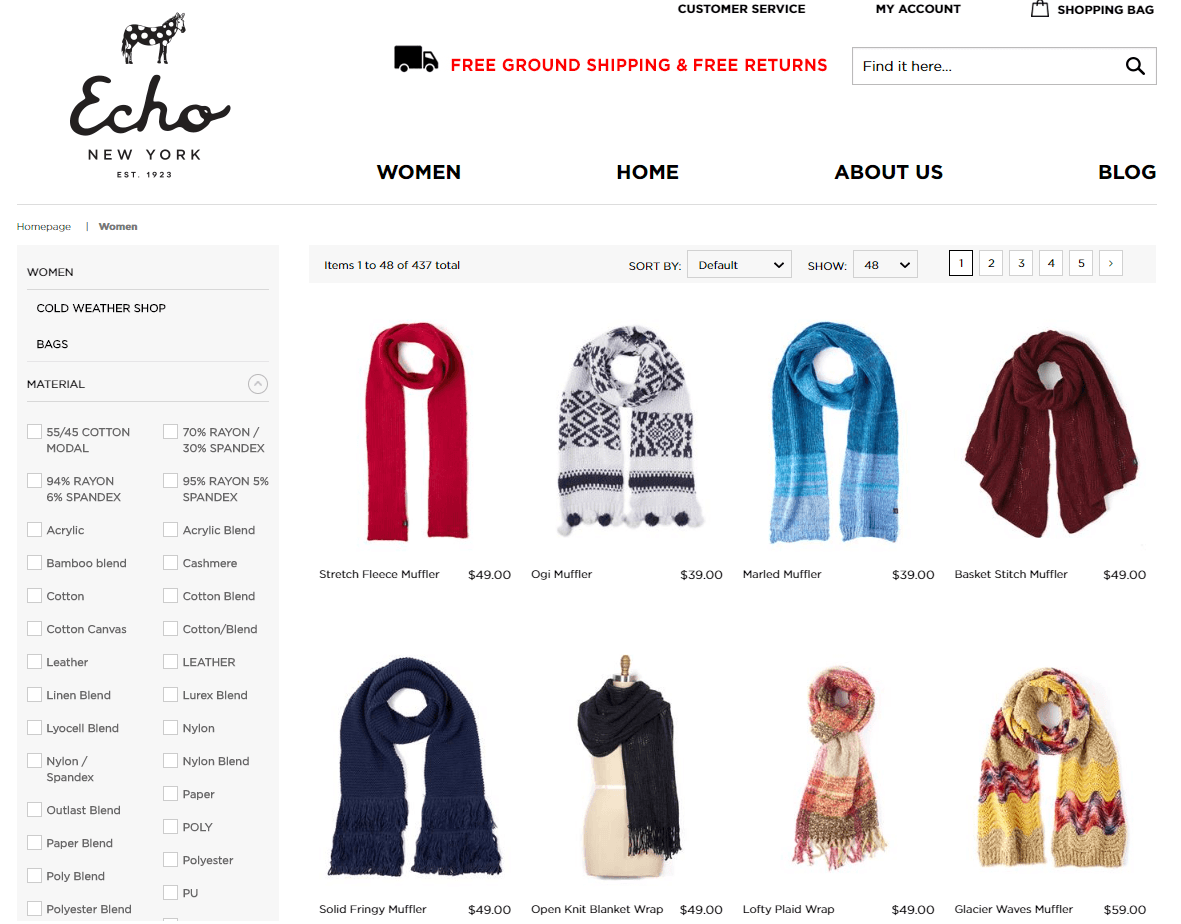
Family business Echo Scarfs launched the Echo company. So, it keeps working as a fashion store for women in New York. Everyone can choose luxury silk scarfs, hats, gloves, swimsuits. The Echo goods are made out of various types of fabrics - aka there are a lot of product attributes. Thus you can see layered navigation that helps the visitor make a decision faster.
The Echo idea is multi-select in other words the display of as many filters for the same attribute as it has.
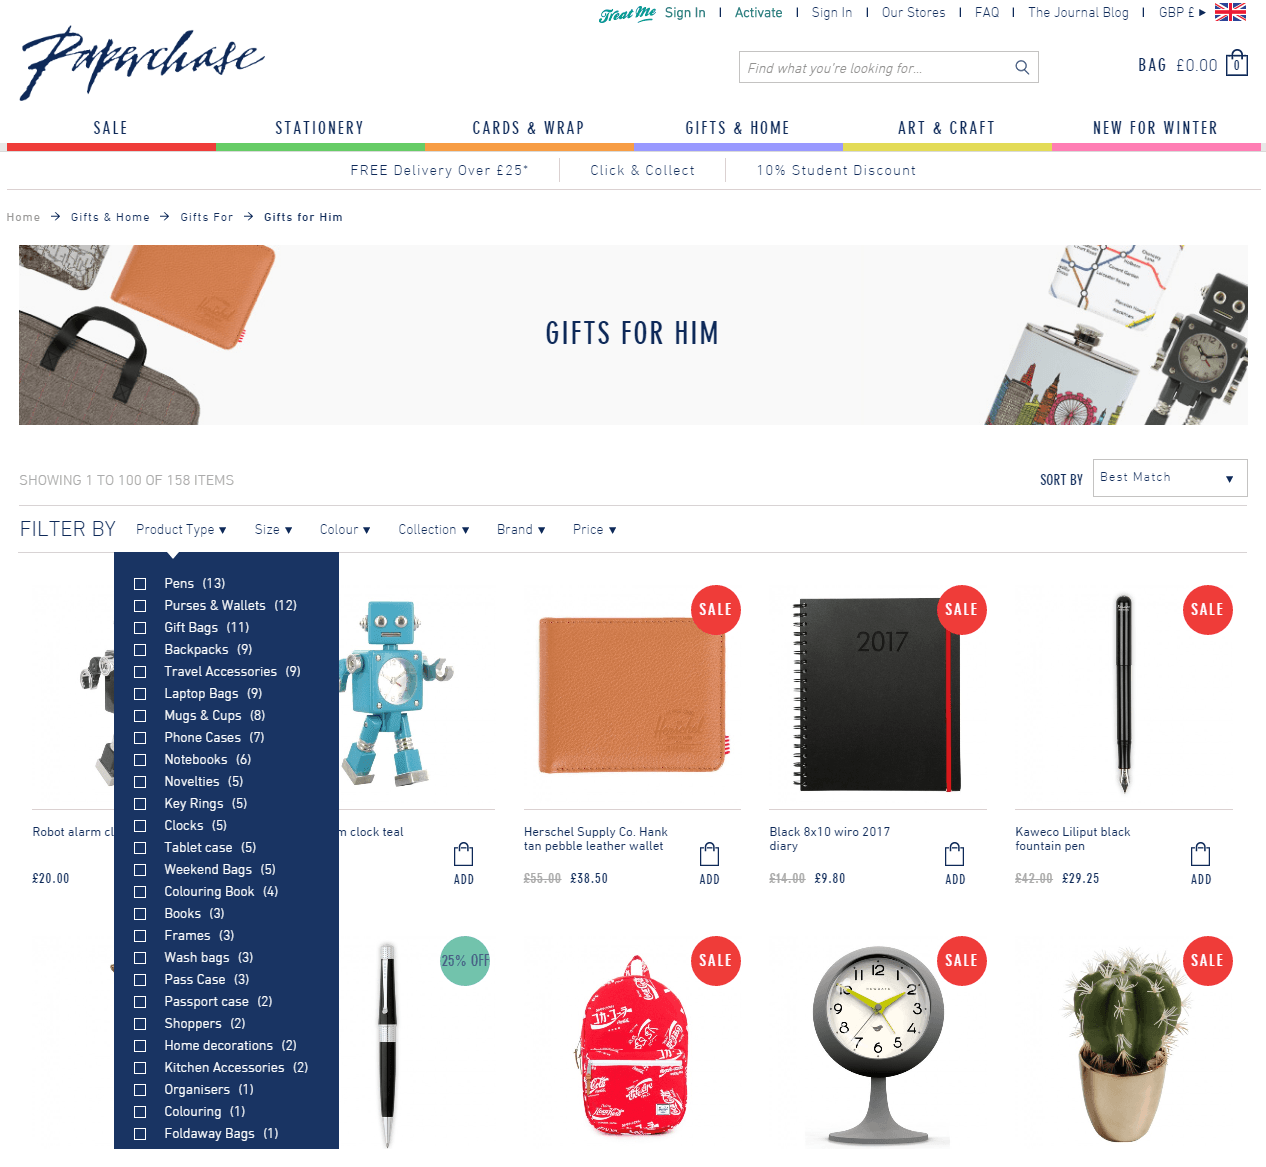
The UK Paper Chase company is a leader in innovative, design-led stationery, cards and gift-wrap. The company sells excellent products in Europe and the USA. The website makes an impression. You can see the brightly colored header, call-to-action-buttons, labels. Pay attention to the layered navigation block. They highlighted the background in different colors.
The Paper Chase idea is to customize both the background and attribute filters to make them visible. This is a good method to help customers focus on the required product option.
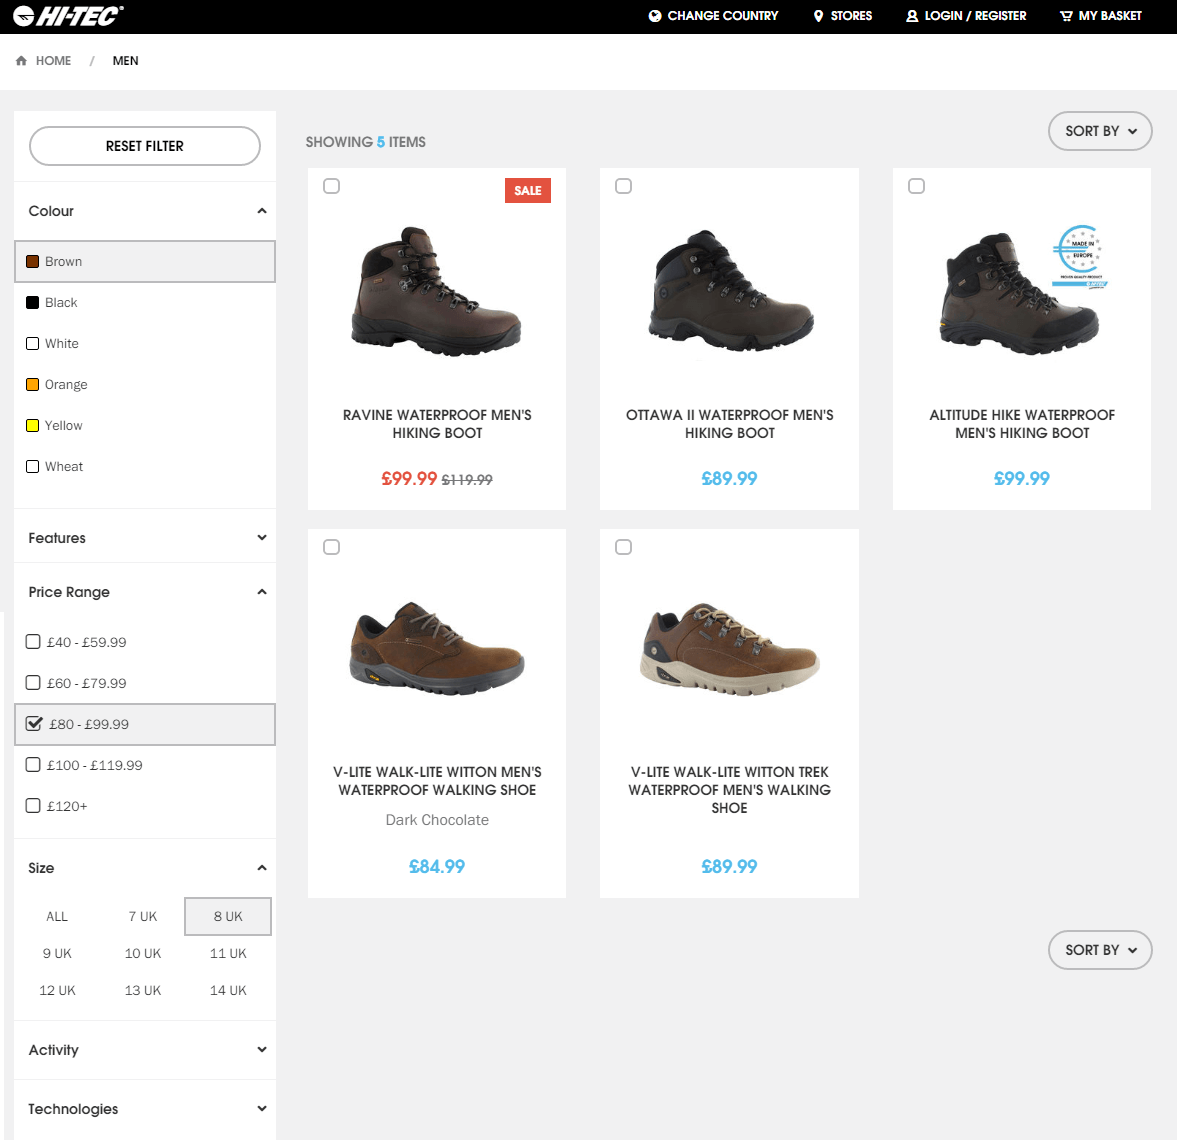
If you are passionate about footwear, go along with the Hi-tec company. Being found in England in 1974, the Hi-tec was expanded to more than 80 countries worldwide. You will meet over 500 Hi-Tec styles well known as the Hi-Tec Outdoor, Hi-Tec Court, Hi-Tec Golf, Hi-Tec Sport, Urban collections, and Magnum brands.
It goes without saying, that the website is friendly throughout. Look at the highlight the Hi-Tec is using to improve the layered navigation.
The Hi-Tec idea is to make reset filters button visible in the top. This small improvement will help users clear all filters easier and faster.
How to optimize layered navigation in Magento via modules
Magento 1 modules
Ajax Layered Navigation by SwissUpLabs team enables layered navigation all-around a store in a single click. The module supports 3 Magento menu: classic, horizontal, and vertical drop-down. There are different types of attribute options display: image attributes, checkboxes, and dropdown. The module allows users to shop by brands, color, price range available in the layered navigation block. You can also assign the layered navigation price ranges individually for each category.
Magento Layered Navigation extension allows you to show categories in the dropdown. Together with sub categories or static 2-level category tree with plus/minus controls. You can also hide or move category filters and exclude any categories from layered navigation. There are many options to display filters: checkbox, radio box, range slider for price.
Magento Layered Navigation Pro module allows you to enable the layered navigation both on the homepage and category pages in your store. You can use images instead of text within the navigation for more visual browsing. The module also allows you to show the price as a slider, a range, or an input field. The extension supports Ajax loading feature.
Layered Navigation module by Extendware allows you to choose 3 different price filter controls: default Magento price selection, slider control price selection, input range price selection. The module is fully Ajax powered.
Magento 2 modules
With the default Magento 2 layered navigation you can show only a block with categories:
- on anchor category
- on quick search results pages
The users can choose to select the one only attribute at a time. This is quite embarrassing. Besides, this is unprofitable for larger websites that are offering big catalogs of products with many attributes. To deliver better customer experience in your store, you have to use layered navigation modules developed for Magento 2.
Let’s start from possible benefits of extensions:
- Search both by categories and product attributes
- Selecting multiple attributes at once
- No page reload with Ajax approach
- SEO friendly navigation URLs
- Adding new advanced filters
Look at well planned layered navigation solutions…
Our first choice for the best layered navigation in Magento 2 version is Ajax Layered Navigation module. It improves navigation with categories and subcategories filters. Includes price attribute slider with 6 skins for great visualizing effect. The module allows for applying many attributes to the same filter. Supports Ajax loading of search results. The layered navigation block is mobile-friendly.
Improved Layered navigation for Magento 2 module provides customers with a friendly browsing process in a store. The extension enables using sliders and widgets for attributes. You can set up many navigation filters. You can also group products by brands and create custom brand pages.
Layered Navigation for Magento 2 module makes the layered navigation block available both on catalog pages and on search result pages. The highlight of extension is 3 new filter options: new, discounted, in-stock. This helps customers categorize and find products easier. Among other nice features, you can see a popover with a result count.
Magento 2 layered navigation extension supports the Ajax loading feature and short SEO friendly URLs creation. What makes the module different is a price slider with various styles: Flat UI skin, Modern skin, HTML5 skin, Nice white skin, and Simple dark skin. You can customize a slider look to make it fit your website design.
Many clients come to us asking how we can help. Hope, we’ ve helped you in understanding the basics of layered navigation functionality. What is that what we want to say else?
The secret of success in either navigation at your website or in customer satisfaction is for you to be ready for improving. New solutions come every day. Review them all.
Summary
You can also review some more useful articles that will help you to experiment with Magento functionality:
- How to remove Magento 2 footer links in your theme.
- All you need to know about color swatches.
- Practical guide to manage banners in Magento and Magento 2.
- How to edit checkout fields in Magento 2.
- Customizing the Magento 2 order confirmation page.
- How to remove product compare functionality.
Don’t wait. Start using our tips today. Go through the way of implementing ideas and let us know in comments.
nice tutorial about layered navigation, but I had some problems.
I have a custom brand pages, where I have a widget with condition to show if manufacturer attribute is LLLL show only them.
How to add layered navigation to that page, only with attributes in layered navigation to match existing ones. At the moment it shows also not relative attributes in layered nav list.
Thanks in advance
Bill
Can you please let me know how we can show layered navigation of a particular category. Like if the category id is 4 then we want only layered navigation will show for category id 4 collection. I also tried by setCategoryId but its not working. Can you provide correct code to call layered navigation of a category. Thanks in advance
Thanks in advance
If there is any way to make all or some of the attributes collapsed under layered navigation than please guide.
thank you