As you might know, our team has been working to integrate Progressive Web App (PWA) into our solutions for eCommerce. We already shared 10 Magento 2 PWA extensions with you last year. Many of you summarized the advantages of developing PWA for your stores. Clients tell about amazing results in performance. They do offer customers a mobile app-like experience in stores.
Your reviews give us energy. And while helping you to turn your website into PWA, we create guides for you to make PWA for Magento easier. Our guide today is for Magento 2 developers and store owners who want to get the benefits of PWA, and still, avoid a headache with the "new" nodejs technology stack. You can also stumble upon the challenge when a stack is not available in your hosting provider settings, and reverse proxy, daemon setup is not your strong point. We are here for you. Read ahead.
Benefits of Progressive Web Applications (PWA)
Progressive Web Application Platform is the best alternative to the native app. Its approach improves an app's cross-platform performance across web and mobile.
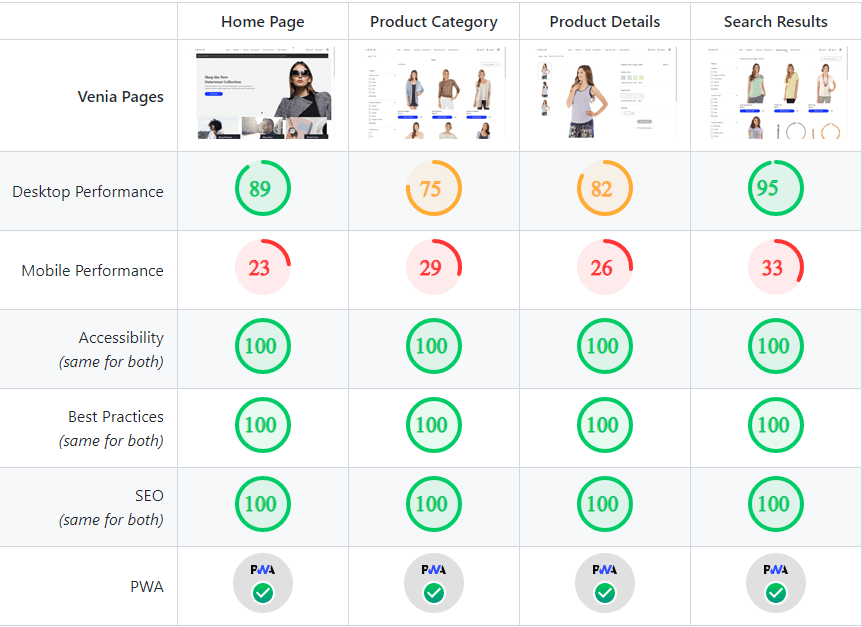
The official Magento Venia PWA Theme hits high Lighthouse scores and shows great results in accessibility, SEO, and performance
For customers, your PWA store will run like just a regular website but with a feeling of a native app on mobile.
Magento has adopted this technological trend. And now Magento PWA Studio offers faster loading speed and reduced cost of development.
Magento developers get many benefits from Magento PWA Studio in terms of easier development experience and workflow. While delivering dynamic storefronts, store owners are allowed to provide the same look of PWA elements as on the standard Magento 2 theme. It's a matter of skills and time.
We got your back. You might have had difficulties with setting up Magento PWA Studio. So, we’ve already shared with you the guide on how to start using Magento 2 PWA Studio on your hosting.
And today there’s another guide. We will:
- Prepare Magento instance for work with PWA-studio
- Download your PWA-studio storefront build code in your Magento root dir
- Configure PWA environment variables
- Build your own PWA-studio storefront project
Let’s do it.
Quick start
Install pwa connector extensions and modules
composer require swissup/module-upward-connector
bin/magento module:enable $(bin/magento module:status –disabled | grep 'Swissup_Core\|Pwa\|Aux\|Upward' | tr '\r\n' ' ')
bin/magento setup:upgrade
bin/magento setup:di:compile
bin/magento setup:static-content:deploy
bin/magento cache:clean
Download the archieve of theme build, and check archive file checksum.
wget https://swissuplabs.com/media/downloads/pwa-studio-argento-dist.tgz
cat pwa-studio-argento-dist.tgz | md5sum
d66fc9c5612f278514a7e05801143f7d
Now you should create PWA folder with build sub-folder.
mkdir -p pwa/pwa-studio-argento-dist
tar xzf pwa-studio-argento-dist.tgz -C pwa/pwa-studio-argento-dist
Enable pwa build theme for a particular store. In our example storeCode is ‘default’.
bin/magento store:list
bin/magento pwa:upward:set
bin/magento pwa:upward:set --path ./pwa/pwa-studio-argento-dist/upward.yml --scopeType store --scopeCode default
bin/magento cache:clean
Clear cache. Let’s test how your PWA-studio storefront works. That’s all.
Here you have to see the difference between the default Magento and the PWA-studio build. And just understand, you shouldn’t pay attention to fonts and styles right now. Focus on the fast performance first. And afterward, you will have to refine styles and typography to suit your website, but only after creating your build.
Later in the article, we’ll broadly describe the process in steps. As a bonus, you’ll learn how to create your own build PWA studio. Keep reading.
Now you’re given the explanation of steps involved in the process of replacing the default Magento frontend theme with a PWA Studio storefront application.
Prepare Magento instance for work with PWA-studio
Install https://github.com/swissup/module-upward-connector - install bundle extension, modules and libs for pwa.
- Install original Magento 2 UPWARD connector module https://github.com/magento/magento2-upward-connector
- Install PWA Metapackage for Magento Open Source Extensions https://github.com/magento/magento2-pwa
- Install swissup/module-pwa-studio-integration -This module add custom fixes and integration for compatibility with pwa-studio and our pwa themes https://github.com/swissup/pwa-argento-home
Run
composer require swissup/module-upward-connector

bin/magento module:enable $(bin/magento module:status –disabled | grep 'Swissup_Core\|Pwa\|Aux\|Upward' | tr '\r\n' ' ')
bin/magento setup:upgrade
bin/magento setup:di:compile
bin/magento setup:static-content:deploy
bin/magento cache:clean
Get (download/build) the PWA Studio project
At this point you have to determine what theme build you’d like to have in your store:
- Our Argento theme
- Venia theme
- Your own custom option
Here you can download storefront archive of Argento and Venia builds:
No need to download this archive manually right now. Later in the guide we’ll download it with CLI commands and will check archives checksum, so there is no hurry to download now.
Also at this stage, you can make another choice. You can install Magento PWA Studio by yourself. It&rsquo's really easy, as we managed to do it. If you wish to create your own build, go to the chapter “ Setup and build your own PWA-studio storefront project”. Then you have to return to this point after you finished creating your own archive build.
Download/Copy your pwa-studio storefront build code in your Magento root dir
At the end of the article, you will see the instructions on how to create the archive build on your own. But now we download or copy our storefront build in your Magento root DIR. You just should unarchive it.
Let’s start:
bin/magento –versionIf you’ve already installed the Argento theme on your Magento store, so you can try to build with @swissup/pwa-argento-home, so run commands:
wget https://swissuplabs.com/media/downloads/pwa-studio-argento-dist.tgz
cat pwa-studio-argento-dist.tgz | md5sum
fa504fe743035156ed7a4dfa636d2f65
If you want to work with the Venia theme, run following commands:
wget https://swissuplabs.com/media/downloads/pwa-studio-venia-dist.tgz
cat pwa-studio-venia-dist.tgz | md5sum
0822c6d0a8b09717a06ccce1f0583d54
If you built a PWA theme on your own, you have just to copy it to the Magento folder.
cp /pwa-studio-argentox-dist.tgz pwa-studio-argentox-dist.tgz
We recommend creating a separate folder for each PWA-studio build. You can use the name of archive build.
For pwa-studio build with @swissup/pwa-argento-home.
mkdir -p pwa/pwa-studio-argento-dist
tar xzf pwa-studio-argento-dist.tgz -C pwa/pwa-studio-argento-dist
rm pwa-studio-argento-dist.tgz
For venia build
wget https://swissuplabs.com/media/downloads/pwa-studio-venia-dist.tgz
mkdir -p pwa/pwa-studio-venia-dist
tar xzf pwa-studio-venia-dist.tgz -C pwa/pwa-studio-venia-dist
rm pwa-studio-venia-dist.tgz
Tip *
Edit your project .gitignore file and add the following entries to track the pwa directory in git:
!/pwa
!/pwa/**
Configure your Magento like the PHP UPWARD server
* Please note that you should have the already installed swissup/module-upward-connector and enabled
The first step is to configure the UPWARD server to access the different PWA sites needed to deploy.
Here's the overview of the CLI provided by the UPWARD module. When you execute the CLI commands, you add pwa_paths to the env.php file. The commands specify the paths to the upward.yml configuration for each PWA site needed to deploy. The following sample shows what an env.php configuration file may look like after using the CLI to add 2 different PWA sites to the default and ‘default’ store configurations:
app/etc/env.php
// ...
'downloadable_domains' => [
  // ...
],
# New configuration point
'pwa_path' => [
  'default' => [
    'default' => ''
  ],
  'store' => [
      'default' => './pwa/pwa-studio-argento-dist/upward.yml'
    ]
]
Use UPWARD connector CLI commands
The UPWARD module commands offer the simplest way to configure the server to deploy different PWA sites. The following sample shows common usage patterns.
To serve the default store front (non-PWA), use an empty string:
bin/magento pwa:upward:set
If your main store template is the Argento Home theme, see how to install it as PWA-studio argento build for store ‘default’:
bin/magento pwa:upward:set --path ./pwa/pwa-studio-argento-dist/upward.yml --scopeType store --scopeCode default
Otherwise we install the Venia build for store ‘default’.
bin/magento pwa:upward:set --path ./pwa/pwa-studio-venia-dist/upward.yml --scopeType store --scopeCode default
Tip*
To find the paths of your PWA sites as shown above for the store, use one of the following commands:
- bin/magento store:list (for store scope)
- bin/magento store:website:list (for store and website scopes)
Tip*
Paths to upward.yml can be relative: ./pwa/pwa-studio-venia-dist/upward.yml or absolute: /var/www/html/pwa/pwa-studio-venia-dist/upward.yml.
So here are all commands together:
bin/magento pwa:upward:set
bin/magento pwa:upward:set --path ./pwa/pwa-studio-venia-dist/upward.yml --scopeType store --scopeCode default
cat ./app/etc/env.php
bin/magento cache:clean
As a result, you should see the new section pwa_path in the Magento settings file app/etc/env.php. Something like the picture below.
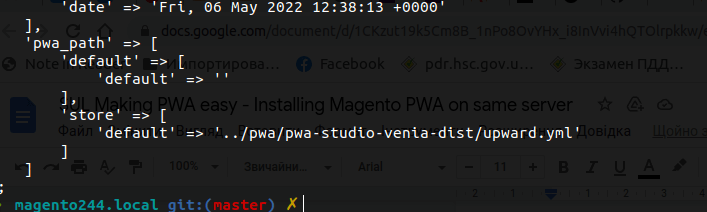
Clean cache and go to the website and review the updates.
Set/configure environment variables
PWA Studio storefronts require you to set specific environment buildtime variables in your project for the build and runtime processes. It’s no need to set it up, because they’re already preset. Check it here.
You can also use fastcgi_params in your nginx server configuration file to set it.
fastcgi_param MAGENTO_BACKEND_URL <magento-backend-url>
Here is a simpler way. You can change a config option in configuration Store > Configuration > General > Web > UPWARD PWA Configuration > Environment variables. Generally, we recommend not changing anything because it must work from the box without configuring.
It’s time to configure the module:
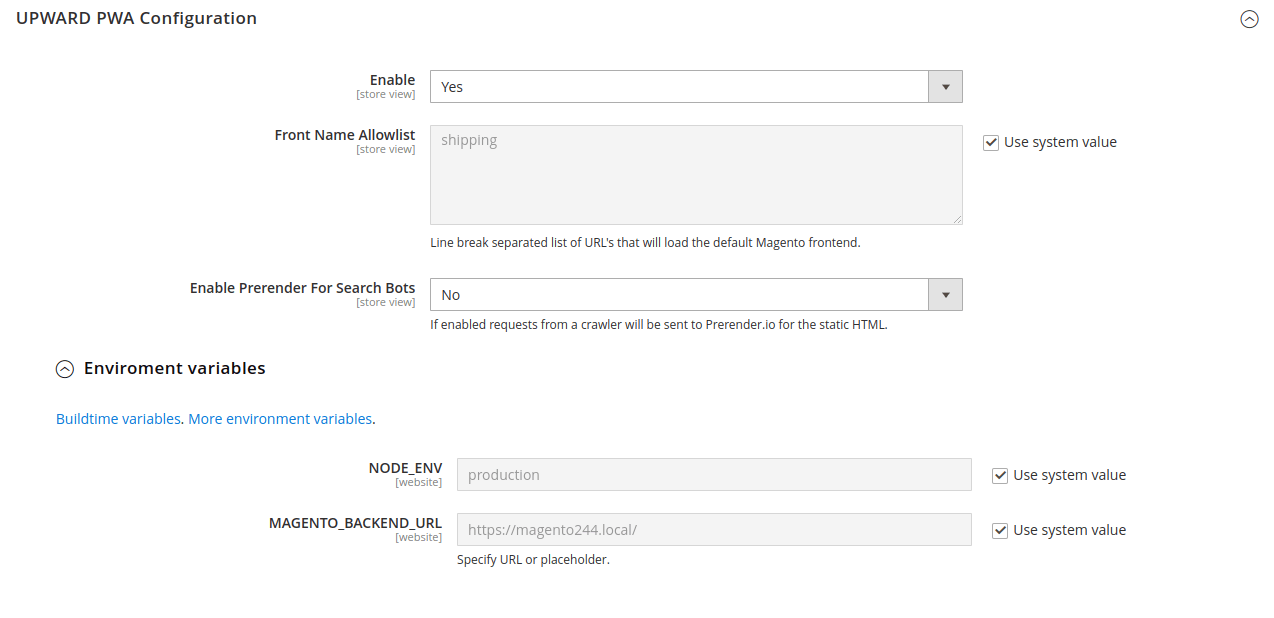
Enable - select the option to enable the pwa storefront.
Frontname allow list - here is the list of exclusions - the list of frontend URLs that will be forwarded to Magento. For instance, the shipping URL will be bypassed to the Magento frontend instead of PWA Studio.
Enable Prerender for Search bots - select Yes to allow crawlers see plain pages. It’s open more configuration options
Enviroment Settings - these settings are constants.
- NODE_ENV - Specifies the node environment type
- MAGENTO_BACKEND_URL - URL of your Adobe Commerce backend
Setup and build own pwa-studio storefront project
First, follow the installation instructions.
After installing you should create the PWA Studio project build by using the below CLI command. It will generate scripts, css files and the dist/upward.yml file that you need to set in the Magento 2 UPWARD connector module.
During this step you can also optionally install our theme to your pwa-studio project. Go ahead.
Install pwa-argento custom theme(optionally)
yarn add @swissup/pwa-argento-home @swissup/pwa-ajaxsearch @swissup/pwa-askit @swissup/pwa-core @swissup/pwa-easy-banner @swissup/pwa-easycatalogimg @swissup/pwa-easy-slide @swissup/pwa-easytabs @swissup/pwa-highlight @swissup/pwa-navigationpro @swissup/pwa-sold-together @swissup/pwa-firecheckout
Add @swissup to trusted vendors
- In your pwa-studio project root open package.json
- Find "pwa-studio" section
- Add "trusted-vendors" section if not exist
- Add "@swissup" vendor to "trusted-vendors"
{  ...
  "pwa-studio": {
    "targets": {
      "intercept": "./local-intercept.js"
    },
    "trusted-vendors": [
      "@swissup"
    ]
  }
}
To get a build run the following commands in your storefront project root:
yarn install
yarn run build
This command makes a lots of code in the dist directory.
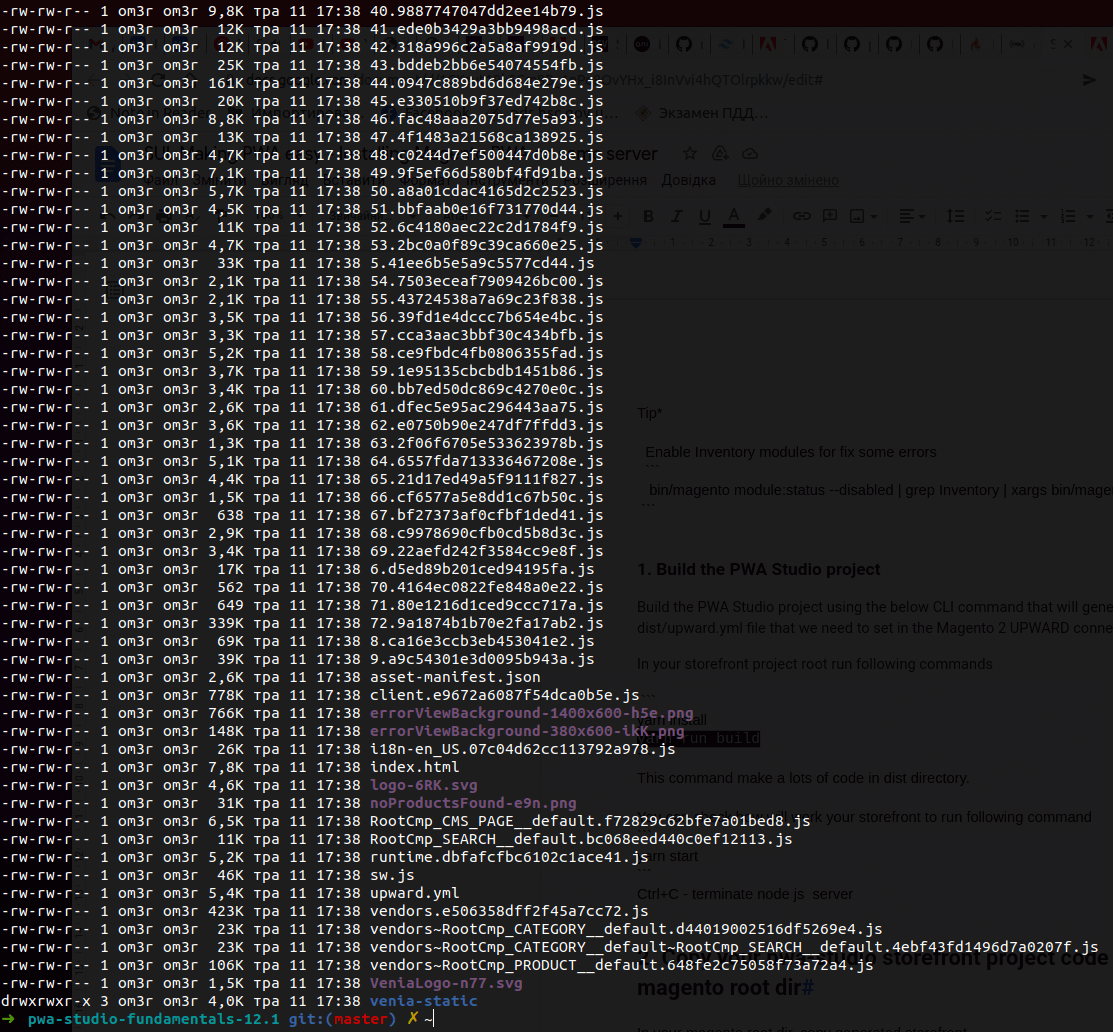
It is your new store front (theme, etc.). You can also check how your pwa-studio storefront works on nodejs. Run the following command.
yarn start
Ctrl+C - terminate node js server
If it looks nice, please create an archive. It is gonna be easier to send it to a remote server and etc.
cd dist/ && tar -czvf ../pwa-studio-argento-dist.tgz . && cd -In summary
So it seems you made a journey to getting Magento PWA on the server. We hope the instructions were clear for you. In case you still have questions, please contact us. We are always glad to help you.
Otherwise, please share your opinions about the PWA experience in your Magento 2 store. Stay in touch.