Have you ever thought about how to collect important customer details more easily? Thus you must keep searching for ways to create custom fields to get meaningful data. You can also include extra fields in the address forms to deliver great customer experience.
Well, we are here today to help you add new custom fields. On user sign-up form, customer account, and in Magento 2 checkout.
We’ ll take a look at how you can quickly customize the extra Address and Customer fields. Our tips are gonna help you save time in a daily workflow as well as receive more information. Start reading.
How to customize the extra fields on a Magento 2 checkout page?
According to the business rule, the checkout field meanings or forms may vary. Anyhow, a seamless checkout experience matters. It is always a nice idea to customize the checkout page to make it user-friendly and intuitive for every single customer.
A bit before, we explained:
- How to disable Middle Name checkout field
- How to make ZIP code as optional
- How to hide the States drop-down on the checkout page
- How to change the number of Street Address lines on the checkout page
- How to remove the Company field or Fax field from checkout.
In the "How to edit checkout fields" tutorial, you will find answers to most of the questions separately for Magento 1 and Magento 2.
There are actually some custom tools that could help you create a more customized checkout experience for Magento 2 store. Less coding, but more automated actions, time-saving process, and 100% result. We are gonna show you a few later in the guide.
But first, let’s see what you can do with input checkout fields within the default Magento configuration.
Default Magento 2 custom checkout fields customization
Well, when it comes to Magento Commerce, it provides nice flexibility in custom fields possibilities right from the scratch. But, if you run your store on the Magento Open Source version, you have to add custom code to get what you need.
Creating a custom field
To create a custom field in Magento 2, you need to start a module with an install script. The script will set up a field in the database and assign it to forms where it should be visible.
Have a look at example install script to create a custom address field. You have to use \Magento\Customer\Model\Customer:: ENTITY entity type.
namespace Swissup\CustomFieldSample\Setup;

use Magento\Framework\Setup\ModuleContextInterface;
use Magento\Framework\Setup\ModuleDataSetupInterface;

class InstallData implements \Magento\Framework\Setup\InstallDataInterface
{
    private $eavConfig;
    private $eavSetupFactory;
    private $attributeSetFactory;

    public function __construct(
        \Magento\Eav\Model\Config $eavConfig,
        \Magento\Eav\Setup\EavSetupFactory $eavSetupFactory,
        \Magento\Eav\Model\Entity\Attribute\SetFactory $attributeSetFactory
    ) {
        $this->eavConfig = $eavConfig;
        $this->eavSetupFactory = $eavSetupFactory;
        $this->attributeSetFactory = $attributeSetFactory;
    }

    public function install(ModuleDataSetupInterface $setup, ModuleContextInterface $context)
    {
        $setup->startSetup();

        $eavSetup = $this->eavSetupFactory->create(['setup' => $setup]);
        $eavSetup->addAttribute(
            \Magento\Customer\Api\AddressMetadataInterface::ENTITY_TYPE_ADDRESS,
            'custom_attribute',
            [
                'type' => 'varchar',
                'input' => 'text',
                'label' => 'Custom Attribute',
                'visible' => true,
                'required' => false,
                'user_defined' => true,
                'system'=> false,
                'visible_on_front' => true
        ]);

        $customAttribute = $this->eavConfig->getAttribute(
            \Magento\Customer\Api\AddressMetadataInterface::ENTITY_TYPE_ADDRESS,
            'custom_attribute'
        );
        $customAttribute->setData('used_in_forms', ['customer_register_address']);
        $customAttribute->save();

        $setup->endSetup();
    }
}
Adding a custom input form
In Magento 2, the process of including the forms on the checkout page is implemented as a UI component. To show custom input form at any of the checkout steps like Shipping Information, Review and Payment Information, or custom, you will have to:
- Create the JS implementation of the form UI component.
- Create the knockout.js HTML template for rendering the form.
- Declare the form in the checkout page layout.
Though you might work through so many steps, it will probably not stop you from trying it manually. Just follow the instructions.
Adding new field in the address form
After handling all mentioned below codes and commands, you will see added new fields. The fields in the default checkout forms such as shipping address or billing address forms. Check it out.
- Add the field to layout.
- Add a JS mixin to modify data submission.
- Load your mixin.
- Add the field to address model.
- Access the value of the custom field on server side.
What about the opportunity to show address fields on the customer registration page? What if to let your client edit the address fields in his account? Or you can display the address fields on printed invoices or shipments.
In fact, it is not a challenge. We'll show you how to add custom fields in the address form in Magento 2. Through using checkout custom field extensions.
How to сonfigure and get the most of the new field in address form?
Here you can see the very helpful extension to include extra fields in the shipping address in Magento 2. We integrated the Address Field Manager module with the checkout page as well as the customer account page.
Let’s see what you can do within the extension configuration:
- Change address form fields status, sort order, default values and labels.
- Display custom address fields in billing and shipping addresses. The will appear on printed invoices, shipments, refunds.
To do it, you have to add a field to address templates. Go “Stores > Configuration > Customers > Customer Configuration > Address Templates.”
Create new address fields.
With the module you can create a new address field of the following field types: Text Field, Text Area, Date, Yes/No, Multiple Select, Dropdown. Besides, you are able to specify a sort order of the field display and choose the form to show the new field in.

New custom address fields will be automatically displayed:
- In checkout billing and shipping address forms
- In the customer account address section. So your customers would easily edit the address fields in their accounts.
- In admin when editing customer form
- In admin on order view page when editing billing and shipping address.
- In admin when creating a new order form.
Find out more about how Address Fields Manager helps you learn more about your customers and improve workflow.
So, now you know how to add a custom field to Magento 2 shipping address. Next, we are gonna discuss how to add custom registration fields for Magento 2 without extra coding.
How to add new fields on the registration page in Magento 2?
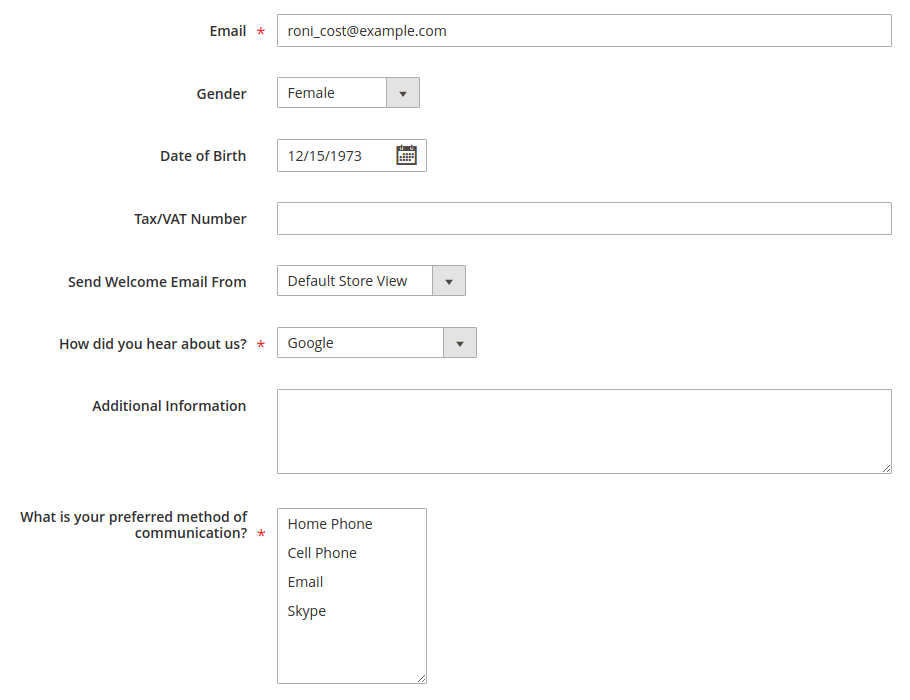
This is a matter of creating any possible custom field of different purposes. Let us present you with a tool that enables:
- creating many customer fields
- the display of extra custom fields on user sign-up form
- the display of custom fields on customer Account edit page
- the display of custom fields in Admin Customer edit form
In the beginning, you have to enable the Magento 2 Customer Fields Manager module in your store. Then you will be able to create extra fields.
The module includes 6 various input types: Text Field, Text Area, Date, Yes/No, Multiple Select, Dropdown. Choose yours that suits the best to your website design and layout. Through the extension configuration, you can also edit the sort order, status, default values, and labels for each custom field.
Adding a new field to signup form in Magento 2 is still a query for what people search for. Well, we know why. A custom field is a great way to collect any information from customers.
- How to remove Magento 2 footer links in your theme.
- All you need to know about color swatches.
- A practical guide to Magento 2 layered navigation.
- How to edit checkout fields in Magento 2.
- Customizing the Magento 2 order confirmation page.
- How to remove product compare functionality.
- Complete guide to Magento 2 performance optimization. Steps, codes, tips.
Thus on the sign-up page, you provide a personalized registration experience in your store. From the very beginning, you improve online communication with your clients. You also receive more information about a potential client. On the checkout page, you may ask: How your visitors heard about your website? Or invite them to answer a few other questions to get the necessary data from your customers in an easy way. You can also use the custom field to call for customers to agree to your Terms of Service.
You can also review some more guides that will help you to improve your Magento website:
In closing
To sum up, there are two fast and easy ways of editing the address fields and other custom fields in your Magento 2 store. We talk about the modules mentioned above. Use these extensions to create custom fields of different purposes.
We hope you' ll see the other tips as helpful, too. Ultimately, you’ ll have to make the decision yourself, whether coding or using ready to use solutions.
In any case, we guarantee our support. If you want to ask a question or make any other comment, please say a few words.