In web performance, many focus solely on the final rendered page, but the rendering process is also crucial. Users will likely leave a page if it appears empty or inactive for more than three seconds. However, if they see some content loading or at least a skeleton of the page, they would stay and keep waiting.
Optimizing Page Rendering with Critical CSS
By employing various techniques, one can render pages more efficiently and sequentially, rather than overwhelming the browser with all resources at once and hoping users stick around long enough for everything to load. This article outlines one of the strategies to take control of the browser's rendering process, creating a smoother loading experience that keeps users engaged. With a better experience, they’re likely to explore more content and make purchases.
By optimizing the delivery of CSS, we can enhance page rendering speed and signal to users that the site is active and ready.
What is Critical CSS?
Typically, CSS styles for a page - or even an entire site - are bundled into a single file, which can slow down downloading and parsing time. If one ensures that the critical styles needed for initial rendering are split out and the rest are lazy-loaded, one can improve how CSS is processed.
Critical CSS involves identifying the minimum set of styles required to display meaningful content and inlining that CSS in the initial HTML request. This confirms that everything necessary for initial rendering is available right away, making your site faster, which is especially important for mobile users who often face high latency and slow connections.
With users becoming increasingly impatient, it’s vital to provide something for them to engage with as quickly as possible. This is where Critical CSS truly excels.
Please note that, usually, a website’s page speed optimization, including adding Critical CSS, is done already when a website is fully ready to sell.
How to Add Critical CSS?
There are two approaches to implementing Critical CSS:
- Manually inline Critical CSS by reviewing your code line by line. The task here is to split your CSS into two categories: critical and non-critical. Yes, line by line. Yes, it takes much time and effort.
- Use a tool like SwissUpLabs Critical CSS Generator to automate the process for you. SwissUpLabs Critical CSS Generator tool was created specifically for our revolutionary Magento 2 PageSpeed extension. Our PageSpeed extension has a magic button that will generate Critical CSS for all the required page types automatically and will add it to the relevant field. Yes, as simple as that: one needs just to press “Generate default Critical CSS” and that’s it.

SwissUpLabs PageSpeed extension -> CSS Settings -> Critical CSS (Prioritize Visible Content)
How to Generate Critical CSS Manually?
If you want to generate Critical CSS for every page type manually, then it should be done as follows:
First you have to create a custom theme and add the Critical CSS to your custom theme files. You may check how to create a custom theme here. Also, you have to disable the "Run unpack on user interaction" option in our PageSpeed module before generating the Critical CSS (SwissUpLabs PageSpeed -> Deferred JavaScripts -> Run Unpack is set to ‘No’ and Run Unpack on User interactive is also set to ‘No’). Then do as follows:
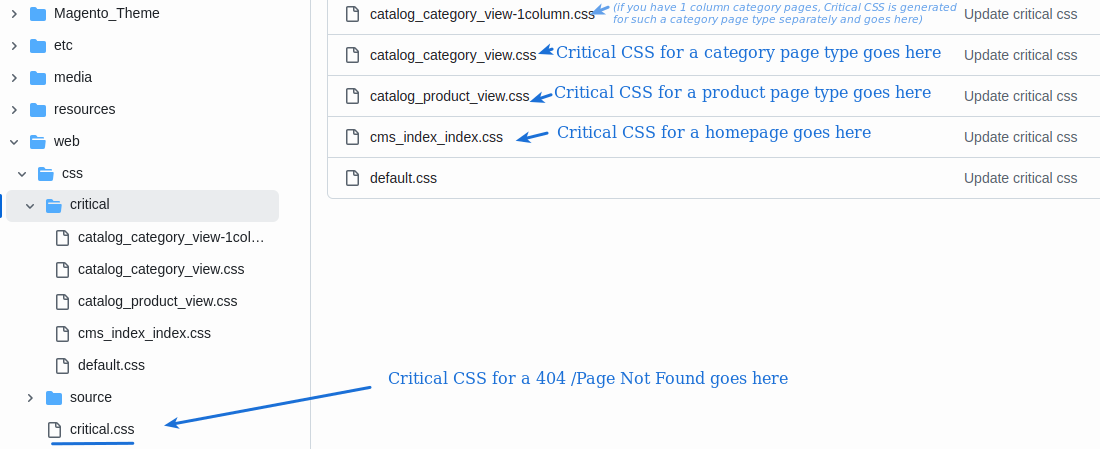
- Generate Critical CSS for any 404 page [Page Not Found] using our Critical CSS generating tool: https://pagespeed.swissuplabs.com/critical-css/ (to generate the critical CSS for the header and footer). For example, https://swissuplabs.com/sample404page/ Then, copy the result and paste it into the web/css/critical.css file.
- Generate Critical CSS for every page type and copy-paste the results into the relevant Critical CSS files. It is important to minus the 404 page as shown on the examples below.
- For the homepage: your website’s link to a homepage,-your website’s link to a 404/Page Not Found page. For example: yourwebsitehomepage.com,-yourwebsite404page.com.

- Category page: [your website’s link to any category page] yourwebsite/some-category,-yourwebsite404page.com [your website’s link to a 404/Page Not Found page]
- Product page: [your website’s link to any product page] yourwebsite/some-product,-yourwebsite404page.com [your website’s link to a 404/Page Not Found page]
Here are the files you have to add Critical CSS to:
Above, we explain how to generate Critical CSS for the main page types only (a homepage, a category page, and a product page), which is the basis and a must. Ideally, one should also generate it for other page types, if they are available (for example, for attribute pages, a checkout page, catalog search pages, etc.).
With our PageSpeed module, you may choose for which pages the Critical CSS will be used. That means that one may either add or exclude certain page types if necessary or simply choose “All Pages”.

Remember to flush the cache.
Now, you can finally address that frustrating "render-blocking CSS" warning.
Optimize your store’s page speed further and improve your website’s Core Web Vitals results with our Magento 2 Page Speed extension.