
Learning best practices with Magento 2 search is always a good idea. The positive search experience is generally expected to be easy, quick and appropriate for the search query. But sometimes failing to go as it should.
It happens the search shows the inappropriate results in the autocomplete suggestions dropdown. And the customers are annoyed, or frustrated, and thereby stop progressing towards purchase. We don't think it's what either of us wants.
Why is search important for conversion? When a search within all catalogs is set up properly, users find a product faster and are more likely to purchase.
You have to provide different ways to let visitors search more conveniently. For instance, you can build Mega Menu with just a few clicks to enable easy access to the products in your catalog. Yet you still can focus on a simple Magento 2 catalog search.
And here we'd like to help you configure it accurately. So your store will offer the appropriate search results only. Our manual will move you through the standard Magento 2 search setup and Elastic search engine configuration. We'll also share with you some tips on how to improve visual performance and auto-complete a search.
What is Magento 2 search and how it works
Here we focus on key concepts like quick search box, advanced search, weighted search, search terms.
We should also mention that since the 2.4 version, you can use only Elasticsearch as the default search engine within Magento 2 Open Source. But we’ll get to that later.
Quick search box
The Search box is visible in the header. Right here a catalog search starts working. Magento performs a search algorithm by text attributes. You can configure them at Stores - Attributes for use in search.
In the search box users enter the first few letters of a product name, or full name, or any other word that describes the product. Then the search results that match the product name will appear below.
When it comes to the search terms that visitors use to find products, you can manage them in Admin.
Search Terms
Here the Magento 2 offers to create multiple search synonyms to make the search more efficient. You should consider the fact that customers may use different words for the same product. And you have to enter a wider range of synonyms a customer might use to find your products.
To enter, please go to Marketing - SEO & Search - Search Synonyms. You will be creating a synonym group. Click New Synonym Group and do as follows:
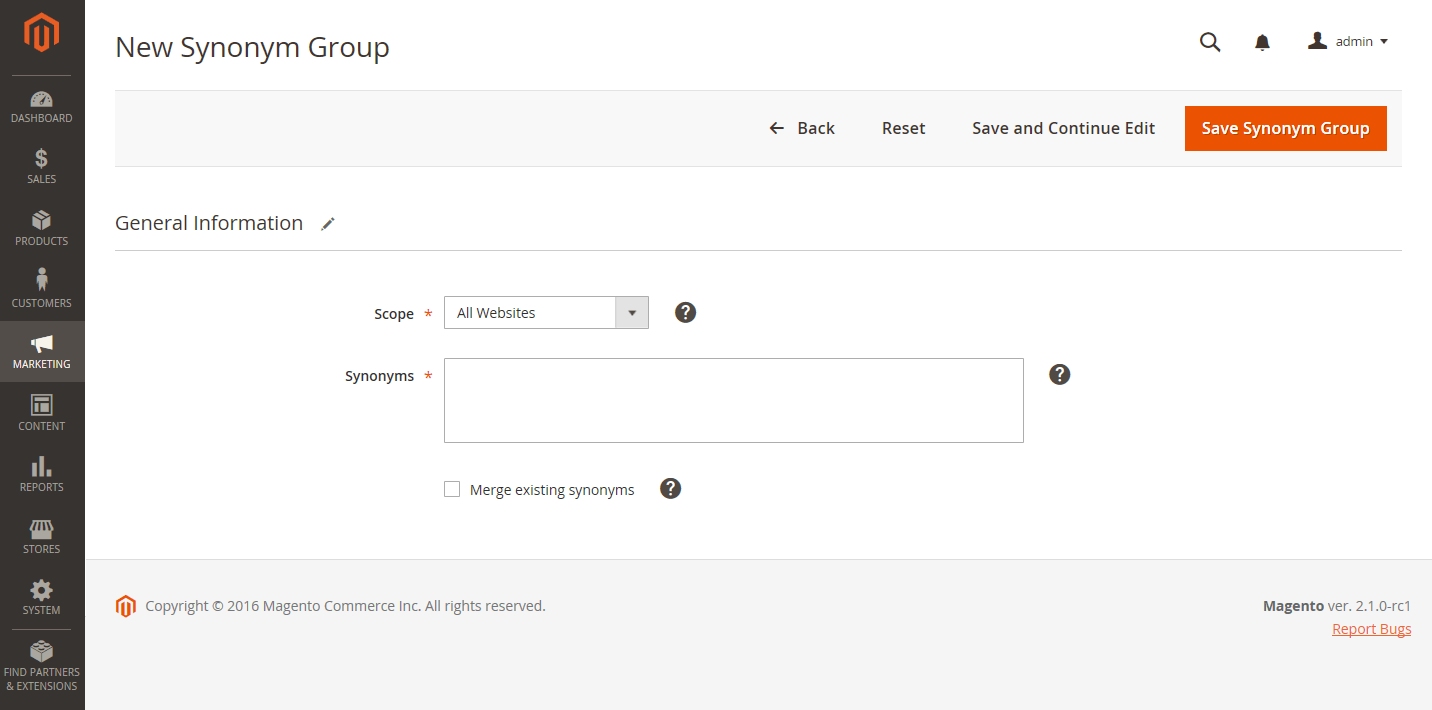
- Set Scope to the store views where the synonyms apply.
- Enter each synonym in the group, comma-separated. Choose words that users might use as search criteria. For example:
- Select the Merge existing synonyms checkbox. It will merge the synonyms into a group with others that have the same scope.
- Click Save Synonym Group.
Magento 2 also includes the search autocomplete feature - Suggested Terms. The feature offers customers a list of results relevant to the user search query. Magento functionality compares the results to known users' queries. You can configure each search query at Marketing - Search Terms.
Afterward, in our manual, we'll show you the additional method to show the most relevant search results. Keep reading.
Well, then the most common queries will be displayed on the Popular Search Terms page. In Magento 2, this feature is considered a search engine optimization tool. It doesn't relate to the catalog search process, but you can still enable this option to help search engines rank your store higher.
Advanced search
Advanced search is another Magento feature that performs search by attributes. The advanced search is available in the footer of your store.
Note: if you want the attribute to be used in an advanced search, please enable the Visible in Advanced Search option at Stores - Attributes - Product.
Weighted search
When you enable the product attributes for catalog search, you can assign a weight to them. That brings a higher value in search results.
To set the weight, go to Stores - Attributes - Product.
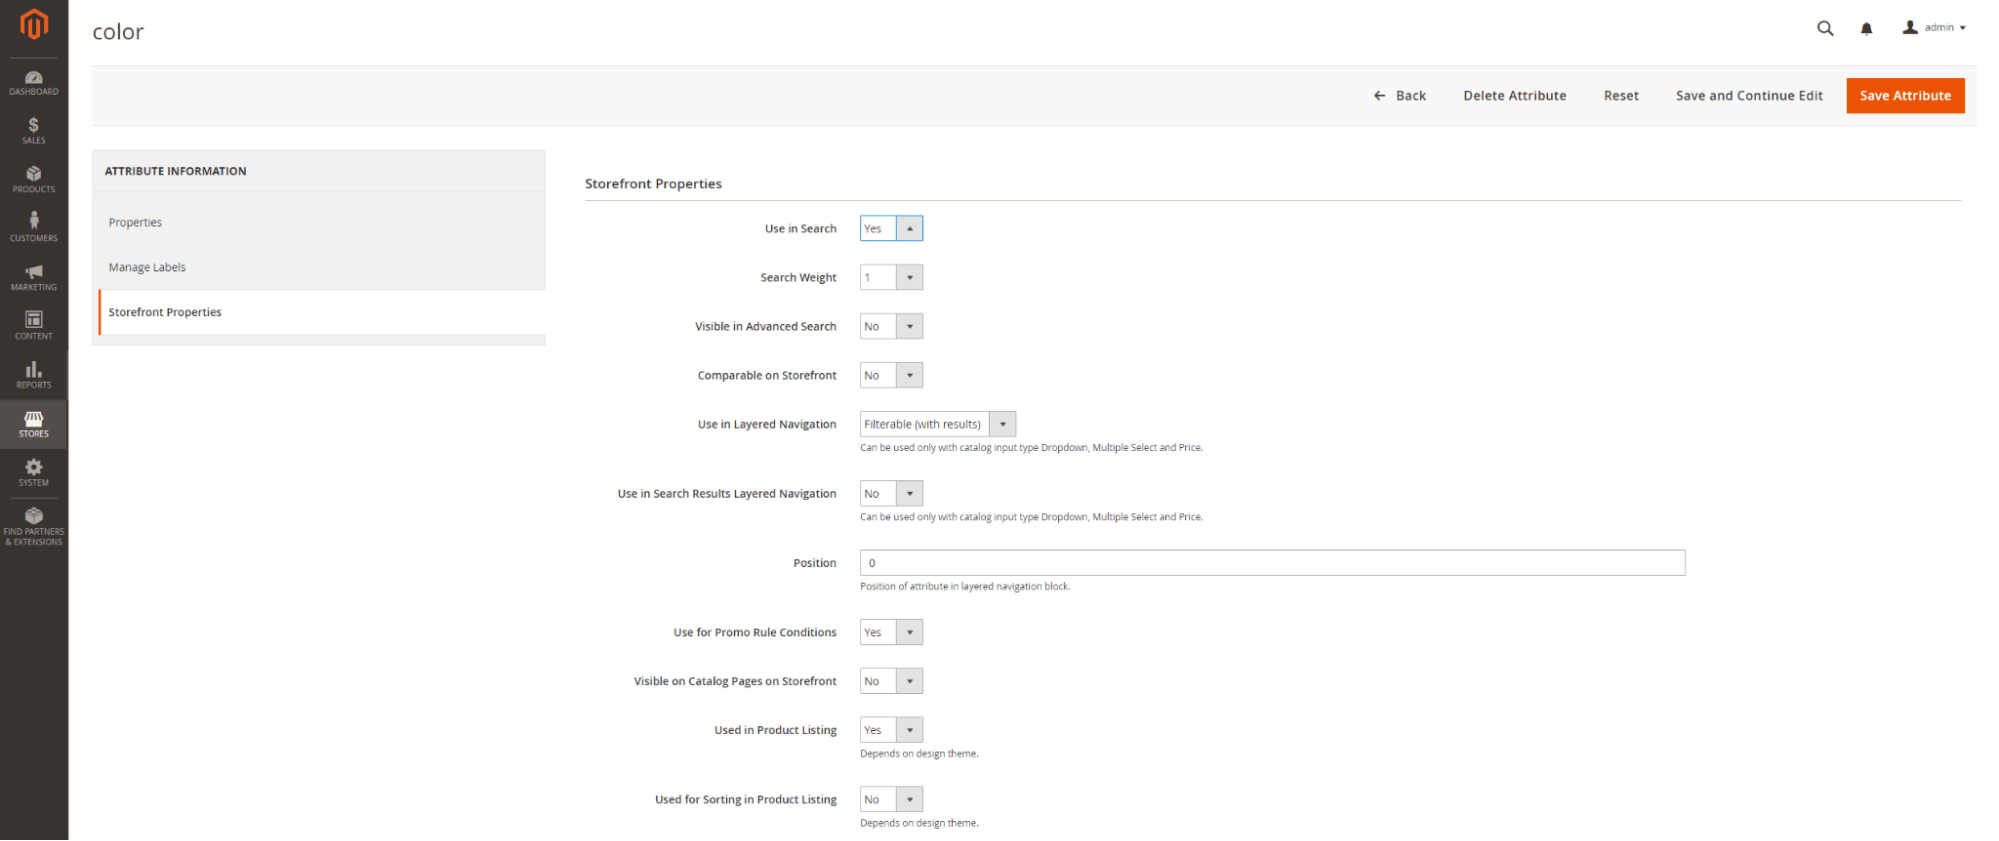
- Find the attribute in the list and open it in edit mode. Choose Storefront Properties. Here do as follows:
- In the Use in Search field, set to Yes to include the attribute in search queries
- In the Search Weight field, select the number from 1 to 10, where 10 has the highest priority. If you don't select any value, the search weight of 1 will be assigned to all attributes.
- Click Save Attribute.
Setup of Catalog Search in Magento 2
First, we have to configure general search options. Go to Stores - Settings - Configuration - Catalog - Catalog Search section.
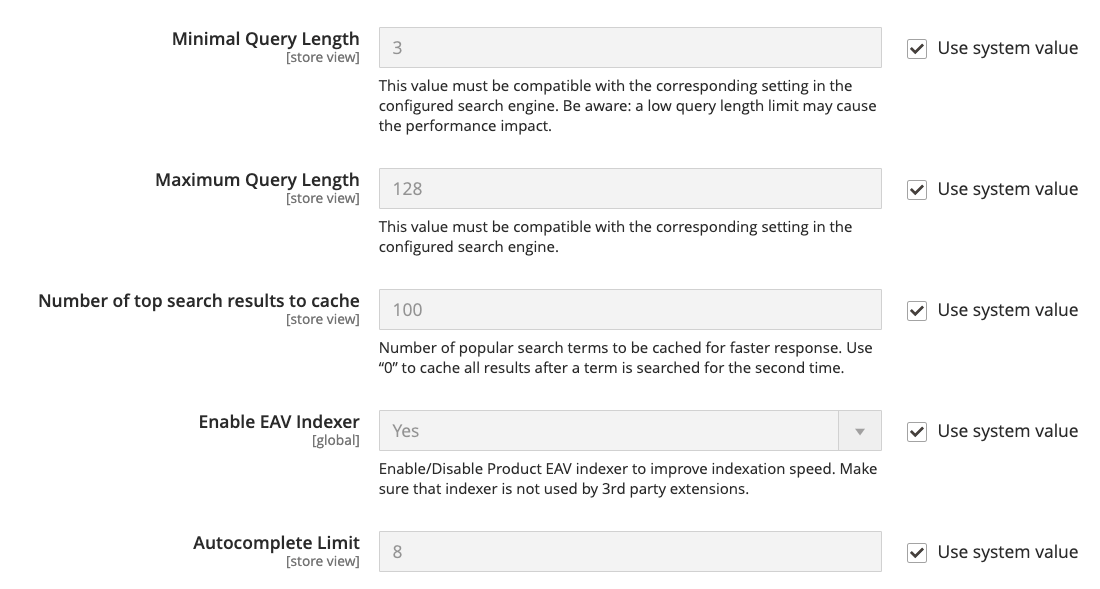
- In the Minimal Query length and the Maximum Query length fields, set a value to limit the length and word count of the search query text.
Note: The value set for this minimum and maximum range must be compatible with the corresponding range set in your Elasticsearch search engine configuration. We'll review it in our manual then.
- In the Number of top search results to cache field, set the appropriate value to limit the number of popular search results to cache for faster responses.
Note: the default value is 100. The value of 0 caches all search terms and results when entered a second time.
- In the Enable EAV Indexer field set to Yes to enable EAV Indexer. It will improve indexation speed and restrict the indexer from being used by third-party extensions.
- In the Autocomplete Limit field, set an amount to limit the maximum number of search results to display for search autocomplete.
Note: restricting this amount increases the performance of searches and reduces the displayed list size. The default value is 8.
We will now proceed to configure Magento 2 to use a supported search engine - ElasticSearch. Since Magento 2.4.0, Elasticsearch 7.6.x is required for all installations.
Elasticsearch connection configuration
Before setting up the Elasticsearch service, we'd like to remind you about still the possibility of replacing a required search engine with Mysql Search. The Mysql Search module for Magento 2 allows for installing Magento 2.4 without Elastic search enabled.
It was added a new value in the Catalog Search configuration settings. So you have to choose the "Legacy MySQL (Deprecated) value" in the Search Engine drop-down. There are also recommendations on how to change the search engine over SSH/CLI.
After you reindex your store Catalog Search index, you will able to still build a custom search using MySQL.
To extend the default Magento 2 search capabilities, you may also pay attention to some other third-party engines.
Now, let’s see how to configure Magento to use Elastic.
Please note, that the Search Engine, Elasticsearch Server Hostname, Elasticsearch Server Port, Elasticsearch Index Prefix, Enable Elasticsearch HTTP Auth, and Elasticsearch Server Timeout fields you should have configured when installing or upgrading Magento. These values should only be changed when upgrading or modifying Elasticsearch. See more at Magento official docs.
You still have to be at Stores - Settings - Configuration - Catalog > Catalog - Catalog Search. In the Search Engine field, choose the default value Elasticsearch 7.
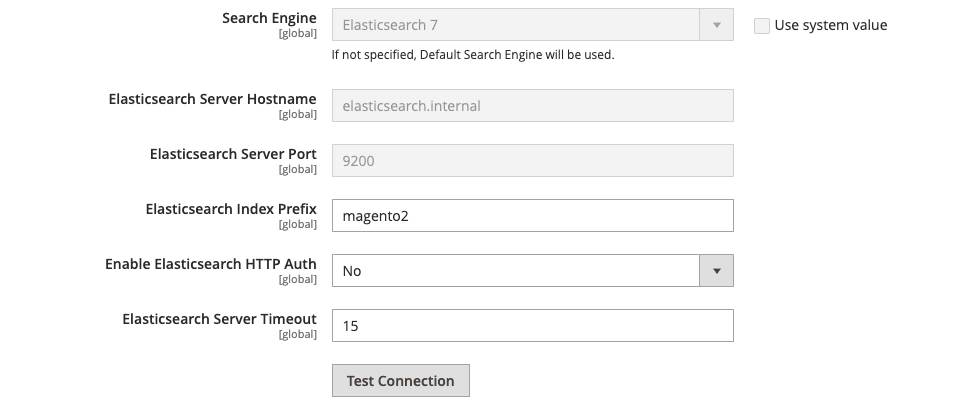
- In the Elasticsearch Server Hostname field, specify the default value that was set up when Magento was installed.
- In the Elasticsearch Server Port field, specify the default value that was set up when Magento was installed.
- In the Elasticsearch Index Prefix field, enter a prefix to identify the Elasticsearch index.
- In the Enable Elasticsearch HTTP Auth dropdown, select Yes to use HTTP authentication to prompt for a username and password to access Elasticsearch Server.
- In the Elasticsearch Server Timeout field, enter the number of seconds before the system times out.
Then you should verify the configuration. Click Test Connection.
To finish configuring Magento 2 catalog search, you have to configure suggestions and recommendations.
Search suggestions configuration
Go to Stores > Configuration > Catalog > Catalog > Catalog Search
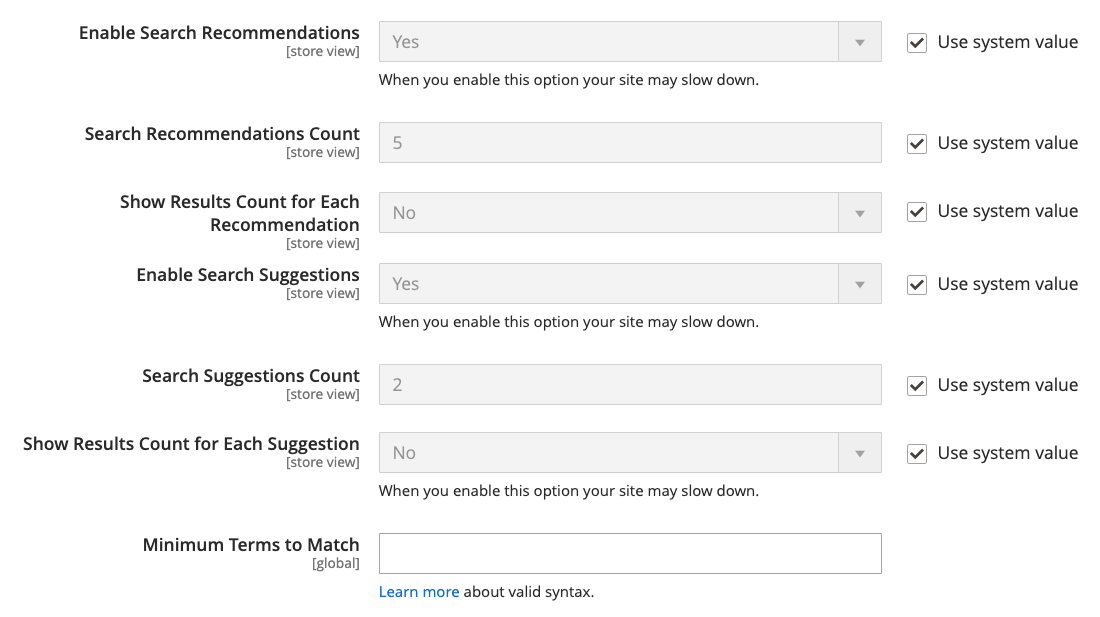
In the Enable Search Recommendations field, select Yes to offer recommendations. Then do as follows:
- In the Search Recommendation Count field, enter the number of recommendations to offer.
- In the Show Results Count for Each Recommendation field, select Yes.
Now in the Enable Search Suggestions field, select Yes and do as follows:
- In the Search Suggestions Count field, enter the number of search suggestions to offer.
- In the Show Results for Each Suggestion field, select Yes to show the number of results found for each suggestion.
Since we're talking about suggestions, it is time to discuss one area that definitely needs to be improved in Magento 2 search.
Auto-complete feature
Here we'd like to share with you our Ajax Search and Autocomplete module. The extension is about improved speed and the display of the most relevant search results for your customers.
Briefly, these features are the only 50% of the module has:
- Ability to show the thumbnails for suggested items in a search box. This will improve the visual performance of the Magento 2 search as well as the next two features.
- The display of hint patterns in an input.
- 3 design effects for a search box: fade, zoom, and slide.
- The ability to show the relevant CMS pages in suggestions.
- The ability to group search results by category.
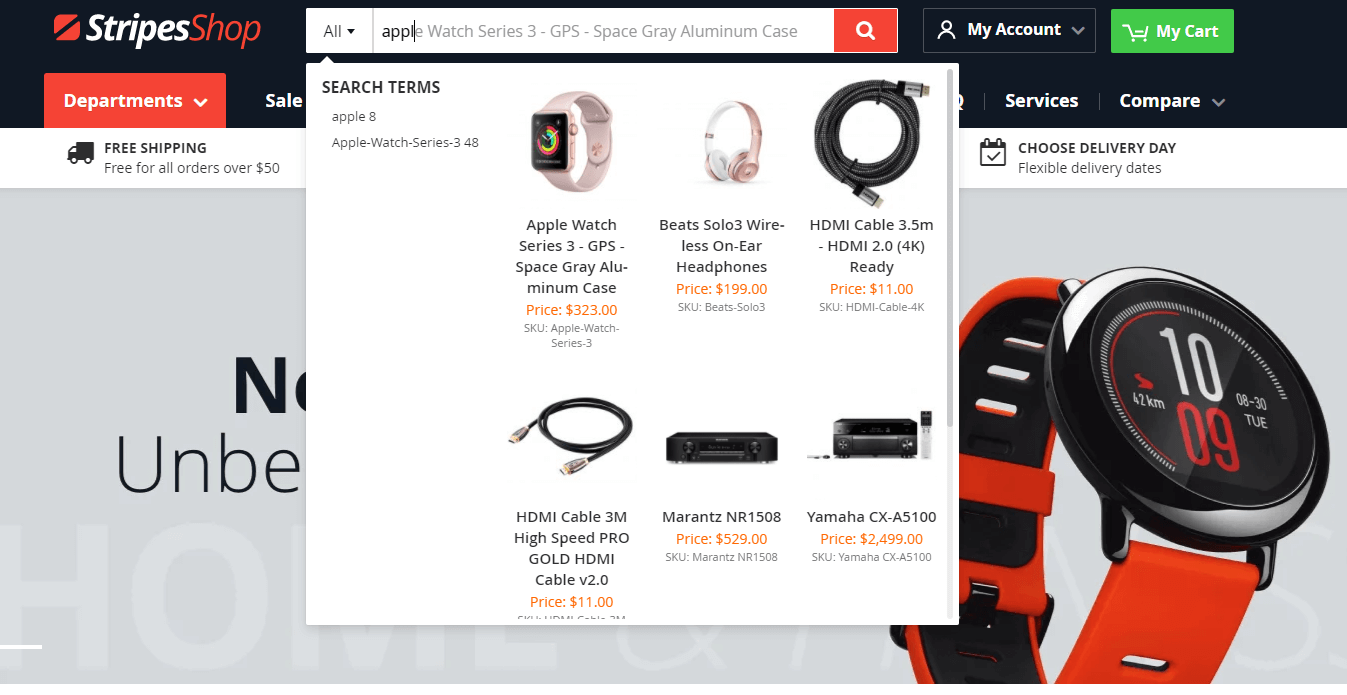
Generally, the Ajax Search and Autocomplete module makes the search process faster and easier. See more details on the module page.
Summary
Today you learned more about Magento 2 search.
We hope our manual will help you to improve search functionality on your eCommerce website. So you will deliver the nicest user experience and get more sales.
In case you have questions, please comment.
We also offer you to look over the following manuals:
- Magento 2 emails complete manual: setup, template modification, sending newsletters.
- Magento 2 composer complete manual. Steps. Common issues.
- A complete tutorial that helps you to create a Magento 2 Iconic Menu.
- How to edit the address and other custom fields in your Magento 2 store?
- The complete guide on Magento 2 translation.
- Complete guide to Magento 2 performance optimization. Steps, codes, tips.
- The most informative guide to manage banners in Magento and Magento 2.