Do you wish to sell globally with a multi-language website? That's great to make your offerings appear on Dutch, Spanish, French, Chinese, or any other language of your target audience.
Luckily, Magento 2 empowers the easy and fast way to professionally translate your content into all the languages. The default features may be enough to satisfy your requirements.
In this tutorial we' ll follow the process of inline translation, adding language package and creating the store views, translating products, CMS pages, local files, and themes translation. Keep reading to see guidelines, paths, codes.
Installing a ready-to-use language packages
When you create a multi-language website in Magento 2, first of all, we suggest searching for language packages provided by other developers. Basically they offer both backend and frontend with hundreds of phrases in different languages. As usual, the language pack provides translated versions for all translatable strings in the code in one CSV-file.
But if you need more clear translation for words, pages, etc., you can add it on your own. We are here to help you.
Magento 2 inline translation
There are some ways of translating words. You can start with Inline Translation included in default Magento 2. By using this method you will be able to add a new translation to the specific store view and backend settings. You will be able to translate the words to totally different language as well as to change a term or a phrase on the same language to another one.
Please notice, the Translate Inline tool is available only when working in developer mode.
Have a look at how it works:
- Go Admin - System - Configuration - Advanced section - Developer tab - Translate Inline.
- Set Yes in Enable for Storefront
- Save
- Disable caches
- Reload the website
Well, now you can see a little book icon along every word that can be translated. It appears when you hover over any text box. As an additional highlight you can see that every string of text that is possible to be translated, is outlined in red.
Let’s translate Login button to Dutch language.
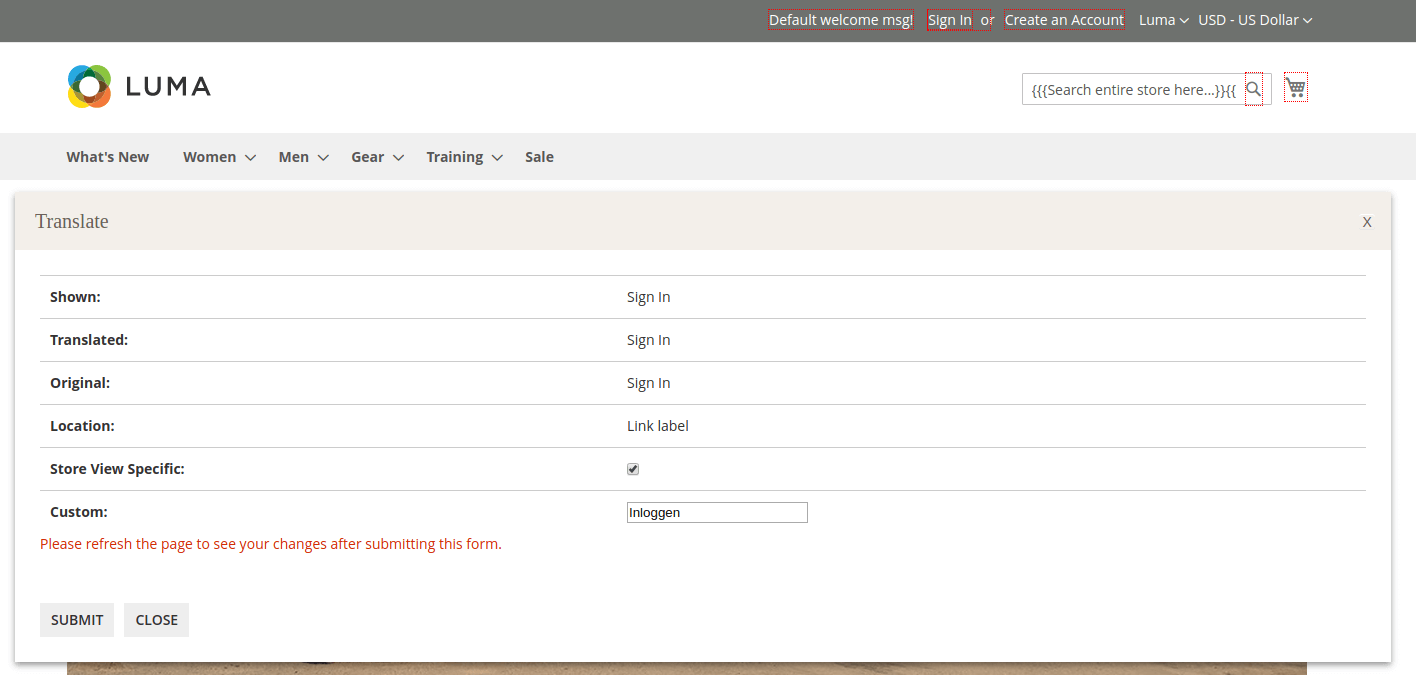
Enter custom text and Submit. Review the results.

Note: be certain you check Store View Specific field during translating. Please mention that the changes will apply just for enabled specific store view. You can switch the store to the correct view using language switcher. The translated text will be saved at the translation table in database.
If you are interested in the inline translation for Magento 1, please read the guide.
Another way of translating separate words or phrases is Translation dictionaries. In fact, this is a comma-separated value (.csv) file with 2 columns: the original phrase in the en_US locale and a translation of that phrase in another locale. Keep reading to see how to generate CSV and edit file.
Translation csv file in Magento 2
Magento 2 supports many languages, so we recommend to create a dictionary for each separate translation. Consequently, you’ll get a set of .csv files. These package files are expected to be deployed in modules.
The Magento application automatically assembles translation dictionaries located in the modules’ i18n directory into a dictionary per language.
So, let’s add .csv file:
- Find a “i18n” inside your module’s folder like. Look at app/code/[namespace]/[module]/i18n e.g. app/code/Swissup/Test/i18n.
- Create a csv file with name of language code. For instance, use en_US.csv, fr_CA.csv for French Canada, he_IL.csv for Hebrew Israel, etc.
- Add the words required to be translated inside csv file. You are gonna change the contents of the second column only. That’s what it looks like:
”<word in english language>”,”<word in language to convert>” - Note 1: start and end all strings with double-quotes. Every string should be separated with comma (,), not a semicolon or any other sign. While translating, pay attention to placeholders like %1, %2. Your text editor should be able to save an edit CSV file in UTF-8 encoding.
- Note 2: you may use the translation dictionary tool in order to translate additional custom terms. Only one variant of translation can be used for a word or phrase. Otherwise, it returns as error.
- Run the static content deploy command to get guaranteed your localization changes.
As a result you’ ve got a collected list of all existing phrases and words for each required language one by one. Further, you can create more than one version of a translation for the same language.
Adding your own language package
In fact, a set of translation dictionaries for a particular language creates a language package. This helps you to get translated all words and phrases or even a particular component— like a module or a theme.
Before starting the process of adding a language pack, please mention that besides the translation dictionary, the language package contains meta-information:
- composer.json that includes any dependencies for the language package and mapping to its defined locale
- language.xml, in which you declare a language package and inheritance rules establishment.
That is why we will create the files for composer.json, registration.php, and language.xml.
Well, the first step was collecting and translating words and phrases. We've already done this above. The next steps look like this:
- Run the language package command. The language packages are located in a directory under app/i18n/<VendorName> in the Magento file system. So, use the next command:
bin/magento i18n:pack [-m|--mode={merge|replace}] [-d|--allow-duplicates] - Create a directory for a language package: For example, /var/www/html/magento2/app/i18n/Swissup/xx_yy
- Add all of the following contents:
- Add a license file if required
- Add a composer.json file. Go app/i18n/Swissup/nl_NL/composer.json and create:
{
    "name": "swissup/language-xx_yy",
    "description": "Sample language",
    "version": "100.0.2",
    "license": [
        "OSL-3.0",
        "AFL-3.0"
    ],
    "require": {
        "magento/framework": "100.0.*"
    },
    "type": "magento2-language",
    "autoload": {
        "files": [
            "registration.php"
        ]
    }
}
- Add a registration.php that registers the language package. Go app/i18n/Swissup/nl_NL/registration.php:
\Magento\Framework\Component\ComponentRegistrar::register(
    \Magento\Framework\Component\ComponentRegistrar::LANGUAGE,
    'swissup_nl_nl',
    __DIR__
);
- Note: you must lowercase the entire path.
- Add a language.xml meta-information file. Go app/i18n/Swissup/nl_NL/language.xml
<?xml version="1.0"?>
<language xmlns:xsi="http://www.w3.org/2001/XMLSchema-instance" xsi:noNamespaceSchemaLocation="urn:magento:framework:App/Language/package.xsd">
    <code>nl_NL</code>
    <vendor>Swissup</vendor>
    <package>nl_NL</package>
</language>
- Note 1: you are allowed to upload many language packages for the language in your Magento 2 store. It helps you to use different custom packages for different parts of your store.
- Note 2: you can also share language packages with other users. Alternatively, you can use translations for some phrases and terms get inherited from parent localizations. Or you can use as well the ready-to-use language packages created by other merchants - we talked about this at the beginning of the guide.
Adding new language to Magento 2 store
We know that the content is rendered by Magento 2 in English (en_US) by default. But our goal is to offer a store in another language in order to communicate better with the customers who would prefer to view your site in their home language.
So now we will guide you through the process on how to create store view in other language. It will help you to get a different translation table with the interface text for your store.
Install a language pack
Install a Language Pack extension using composer or manually. We recommend you to follow the standard instructions from Component Manager.
You can also install it manually using SSH. In order to install language, do as follows:
- Connect to your SSH, navigate to the Magento root installation folder.
- Then run the following command:
composer require swissup/mage2-locale-nl-nl - Note: nl-nl is your locale.
Create a new store view
Go Admin - Stores - Settings - All Stores. Fill in the required fields to create a new store view. Press Save.
Note: you have to enter a code in lowercase characters.
Set up the locale for new store view
- Go Stores - Settings - Configuration - General - General.
- Choose the newly store view.
- Uncheck the “use website” checkbox.
- Open the Locale Options section and select new locale.
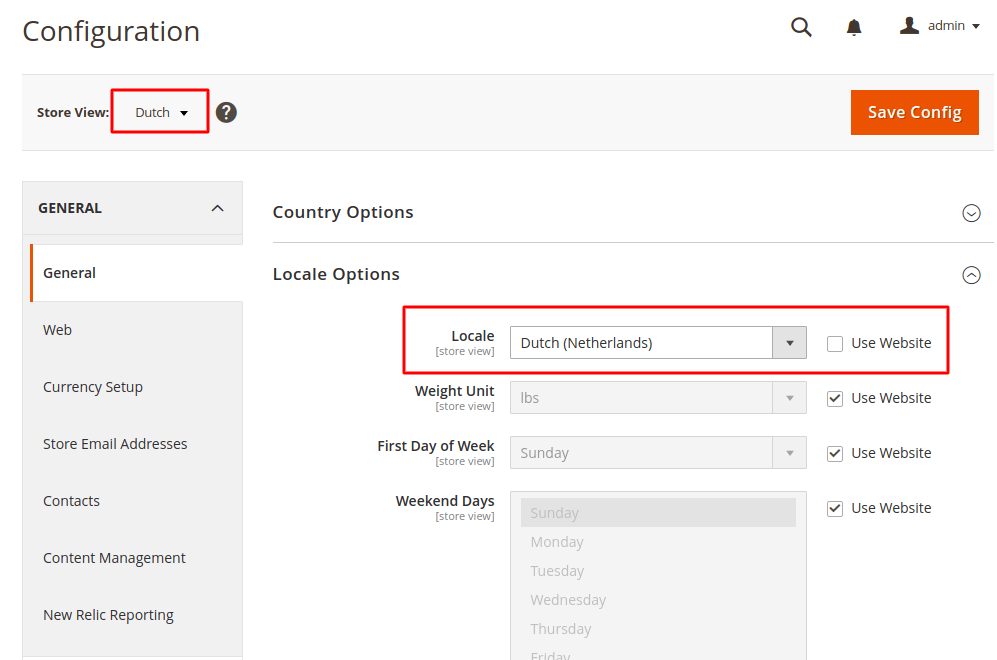
- Save
- Open your SSH client and deploy static files for the installed language
- php bin/magento setup:upgrade
- php bin/magento setup:static-content:deploy nl_NL
What’s next? Time to translate all the remaining content like product names, categories and CMS pages, blocks, etc. Please mention that it must be translated separately for your newly installed store view.
Translating products into other languages
- Go Products - Inventory - Catalog and select a product you would like to edit.
- Choose Store view for the translation display.
- Uncheck the Use Default Value checkbox to disable using the default value for product name
- Enter the translated text.
- Modify all the rest of the text fields like image labels, Alt text, Search Engine Optimization fields and Custom Options information. Ensure you did all possible translation in the new language.
- Save
Translating product attributes
- Go Stores - Attributes - Product and select the attribute in the grid.
- Open the Manage Labels section.
- Within the Manage Title field please paste a translated label for each store view.
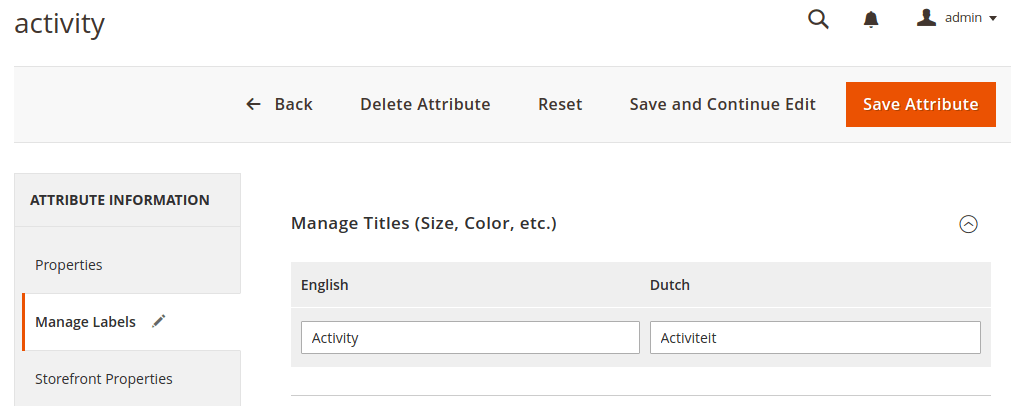
- Save Attribute.
Translating Categories into other languages
- Go Products - Inventory - Categories.
- Set to required Store View.
- Choose the category you want to edit in the category tree. Start translating the category-related content.
- If needed, you can also create a new URL Key for the category. See the Search Engine Optimization section. First, uncheck the Use Default Value checkbox. Then enter the translated text and check the Create Permanent Redirect for old URL box.
- Save Category.
Translating CMS block/pages
- Go Content > Elements > Pages.
- Choose the page you want to edit.
- Create a new page with the same URL Key as Store View for the translation.
- Start translating all the page-related content.
- Save page.
Translating the welcome message
- Go Content - Design - Configuration.
- Choose the new Store View to edit.
- Open the Header section.
- Enter the translated welcome message.

- Save.
Translate the string in Magento 2 in the source code
In .phtml files
If you create new template and want to translate texts in it, put such text inside __() translate function. It will process such text and translate it based on language dictionaries, CSV or phrases saved in the translation table in the database.
- For example:
<h2><?php echo __('How to translate') ?></h2>
- If your string contains a variable,you can use:
<h2><?php echo sprintf(__('How to translate %s'), $yourVariable) ?></h2>
In this example, the ‘Hello %s’ string is added to the dictionary when the i18n tool is run.
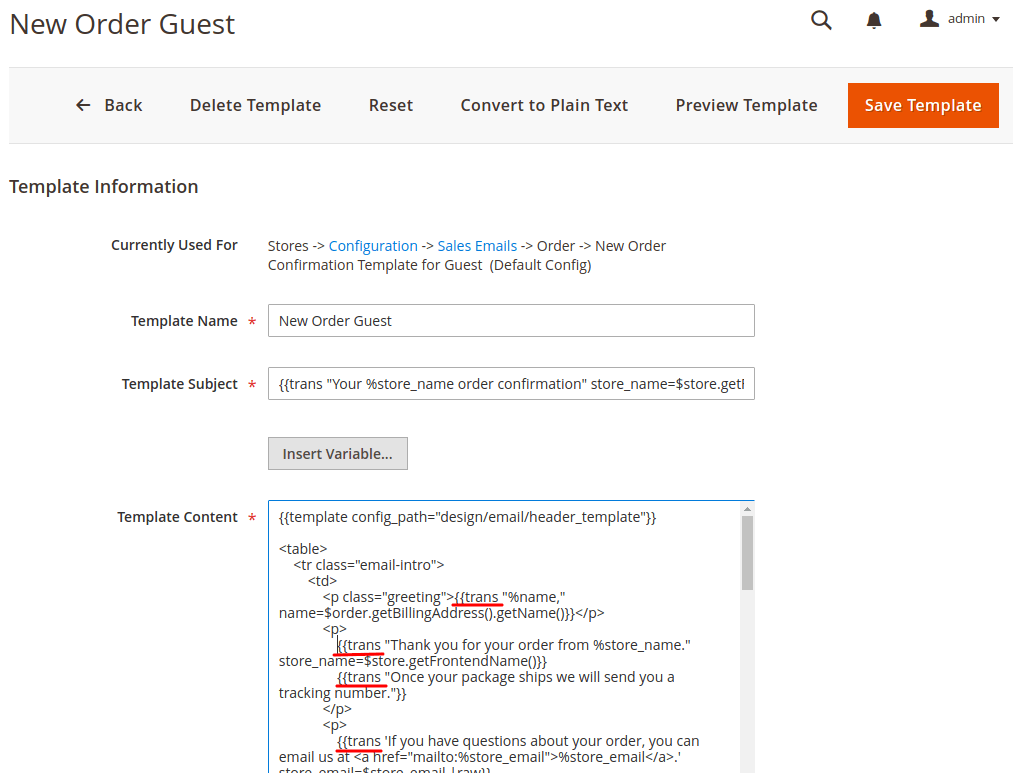
In email template
Go Marketing > Email Templates. If your theme contains a custom email template, use the {{trans}} directive.
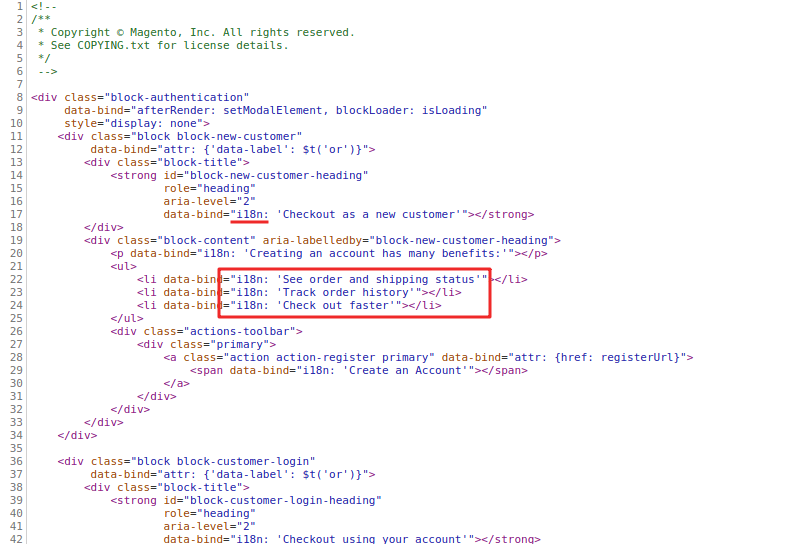
Strings added in UI components’ templates
- A string is added in the scope of an HTML element:
<span data-bind="i18n: 'How to translate'"></span>
- A string is added with no binding to an HTML element:
<!-- ko i18n: 'How to translate' --><!-- /ko -->
Magento 2 custom theme translation
We’ve actually shown all possible ways to localize your store theme in the article parts above. However, we decided to clear up a process of translating the Magento 2 theme using the example step by step based on the Argento theme.
So we begin with creating the following files in the i18n directory.
Note: all changes are stored in the CSV file within the following path:
app/design/frontend/Swissup/argento/i18n/nl_NL.csv
Well, you can see that you simply replace it with your <VendorName>/<ThemeName> in your custom theme.
- Open the command prompt and run the following command to generate the en_US dictionary.
bin/magento i18n:collect-phrases [-o|--output="<csv file path and name>"] [-m|--magento] <path to directory to translate>
- Copy generated en_US.csv and rename it to nl_NL.csv. That will help you to pull translatable words and phrases automatically from the Argento theme.
- Now open the nl_NL.csv file and put your Dutch translation theme. Pay attention to the left and right columns. The left contains the default values (keys), and the right column contains the words to be translated to the Dutch language:
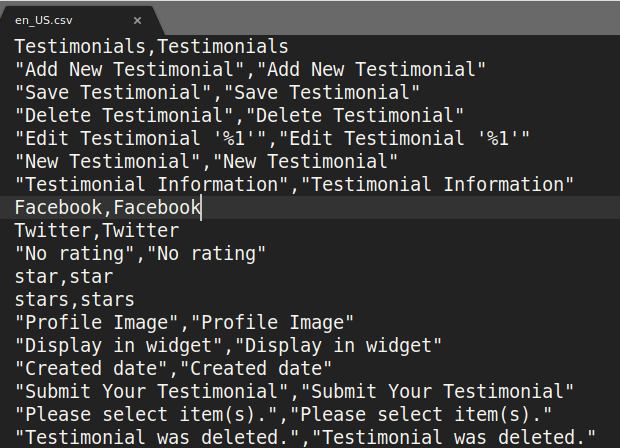
Note: you translate the content of the right column only. Review the results:

Have a look at the placeholders like %1, %2 and so on. They are used by the Magento 2 to insert context values, but not for translations.
- Run deploy command to get changes of localization:
php bin/magento setup:static-content:deploy en_US nl_NL
- Clean the cache and reload the frontend.
That’s it. Enjoy your interface texts translated into Dutch.
In review
Today we have put together a guide for the most common problems and questions that we have seen in performing Magento 2 inline translation, translating module or theme for Magento 2.
In closing, you have 4 things to remember:
- The product names, descriptions, and categories should be translated separately for each store view.
- Some of the strings may be translated several times in different modules.
- In the case of using existing translation - language inheritance, Magento uses the parent phrase or word of the existing dictionary if a new translation fails or is missing.
- Refresh all caches after any changes of your translation CSV file.
As long as you keep creating a multi-language store in Magento 2, we assume you meet the other difficulties. If you have ones, or you even know how to solve them, you' re welcome to share your experiences in comments.